Cinnamon and Cardamom Bread

img_4709

This stuff is amazing!  Love!

We just returned from a family vacation to New Orleans.  The land of great food, really wonderful music everywhere, and a plentitude of adult beverages.  And people watching.  We enjoyed poboys, gumbo, oysters, shrimp, catfish and, of course, beignets.  As good as our food was, whenever I get home from a vacation I actually kind of enjoy eating my own cooking again.  Funny how that works.

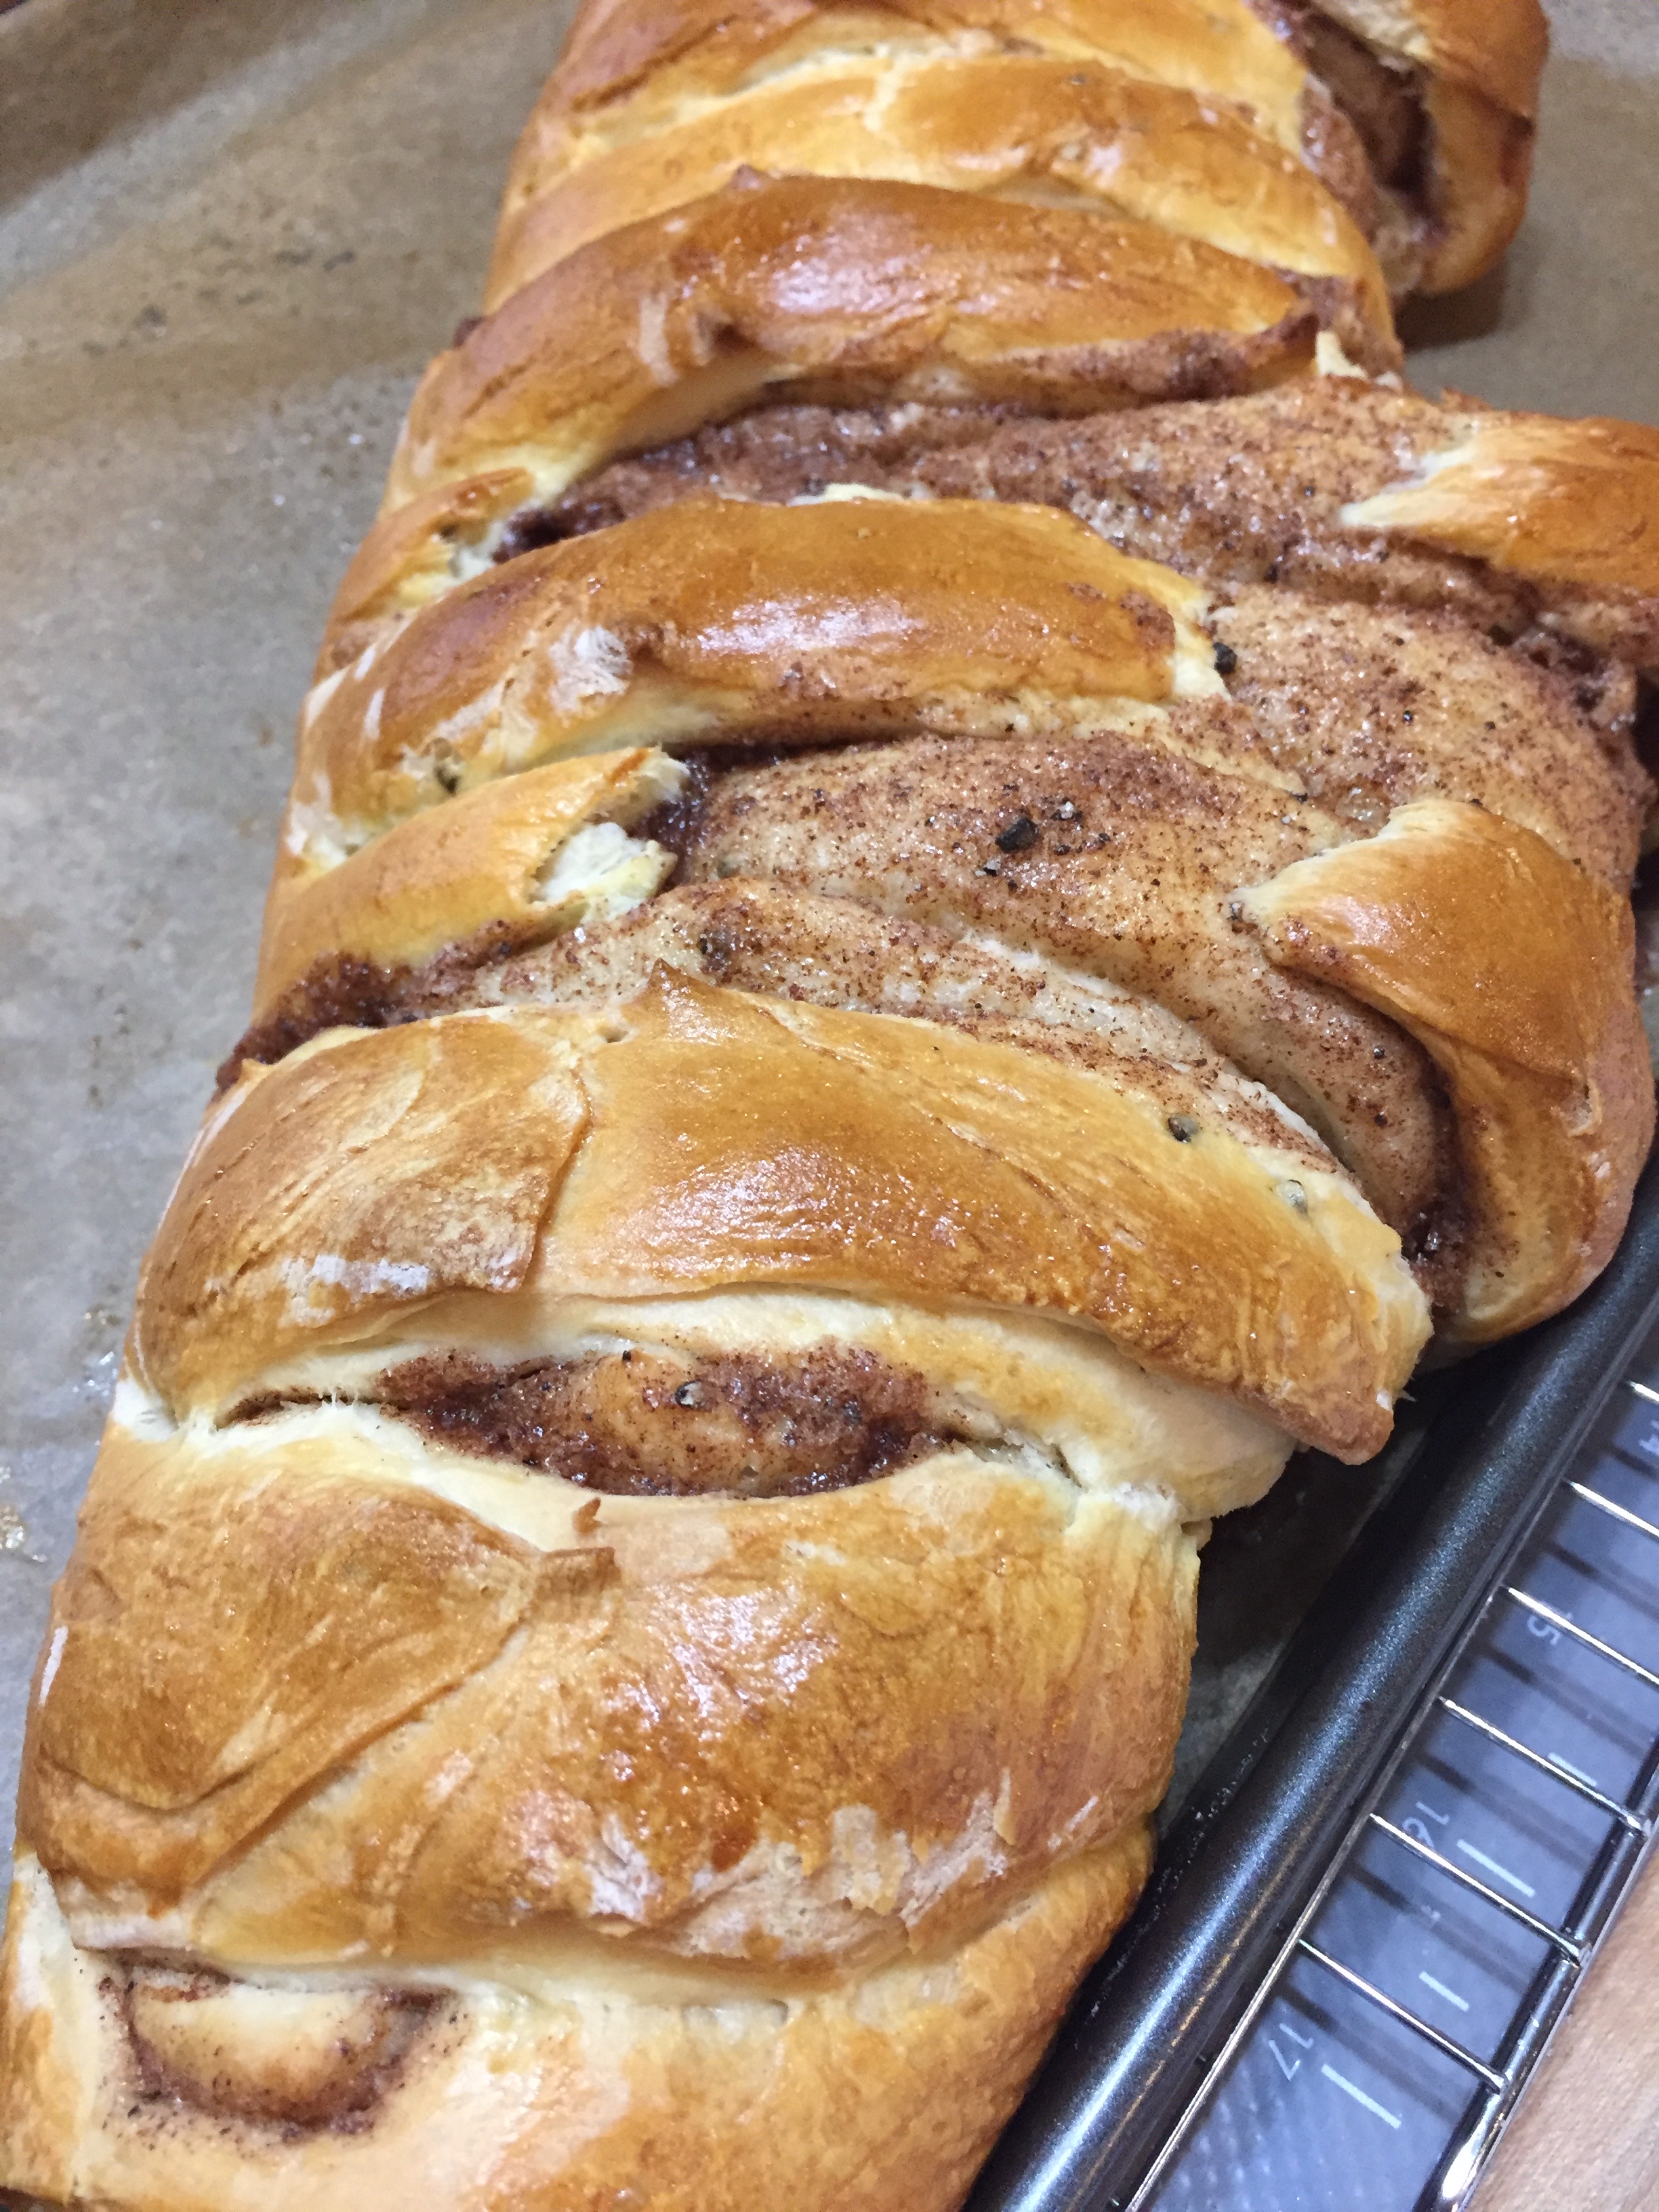
I had some organic milk in the refrigerator that was going to go south in just a day or so and I wanted to put it to good use.  I decided to make us some bread with my remaining milk and came across this recipe that I had clipped from a Saveur magazine early last year but had not tried.  Until today.  The recipe says the bread is Swedish.  But since I’m Finnish, today it is Finnish Cinnamon Cardamom Bread.  Whatever your ethnicity I think you will enjoy!  The kitchen smelled wonderful while this was baking.

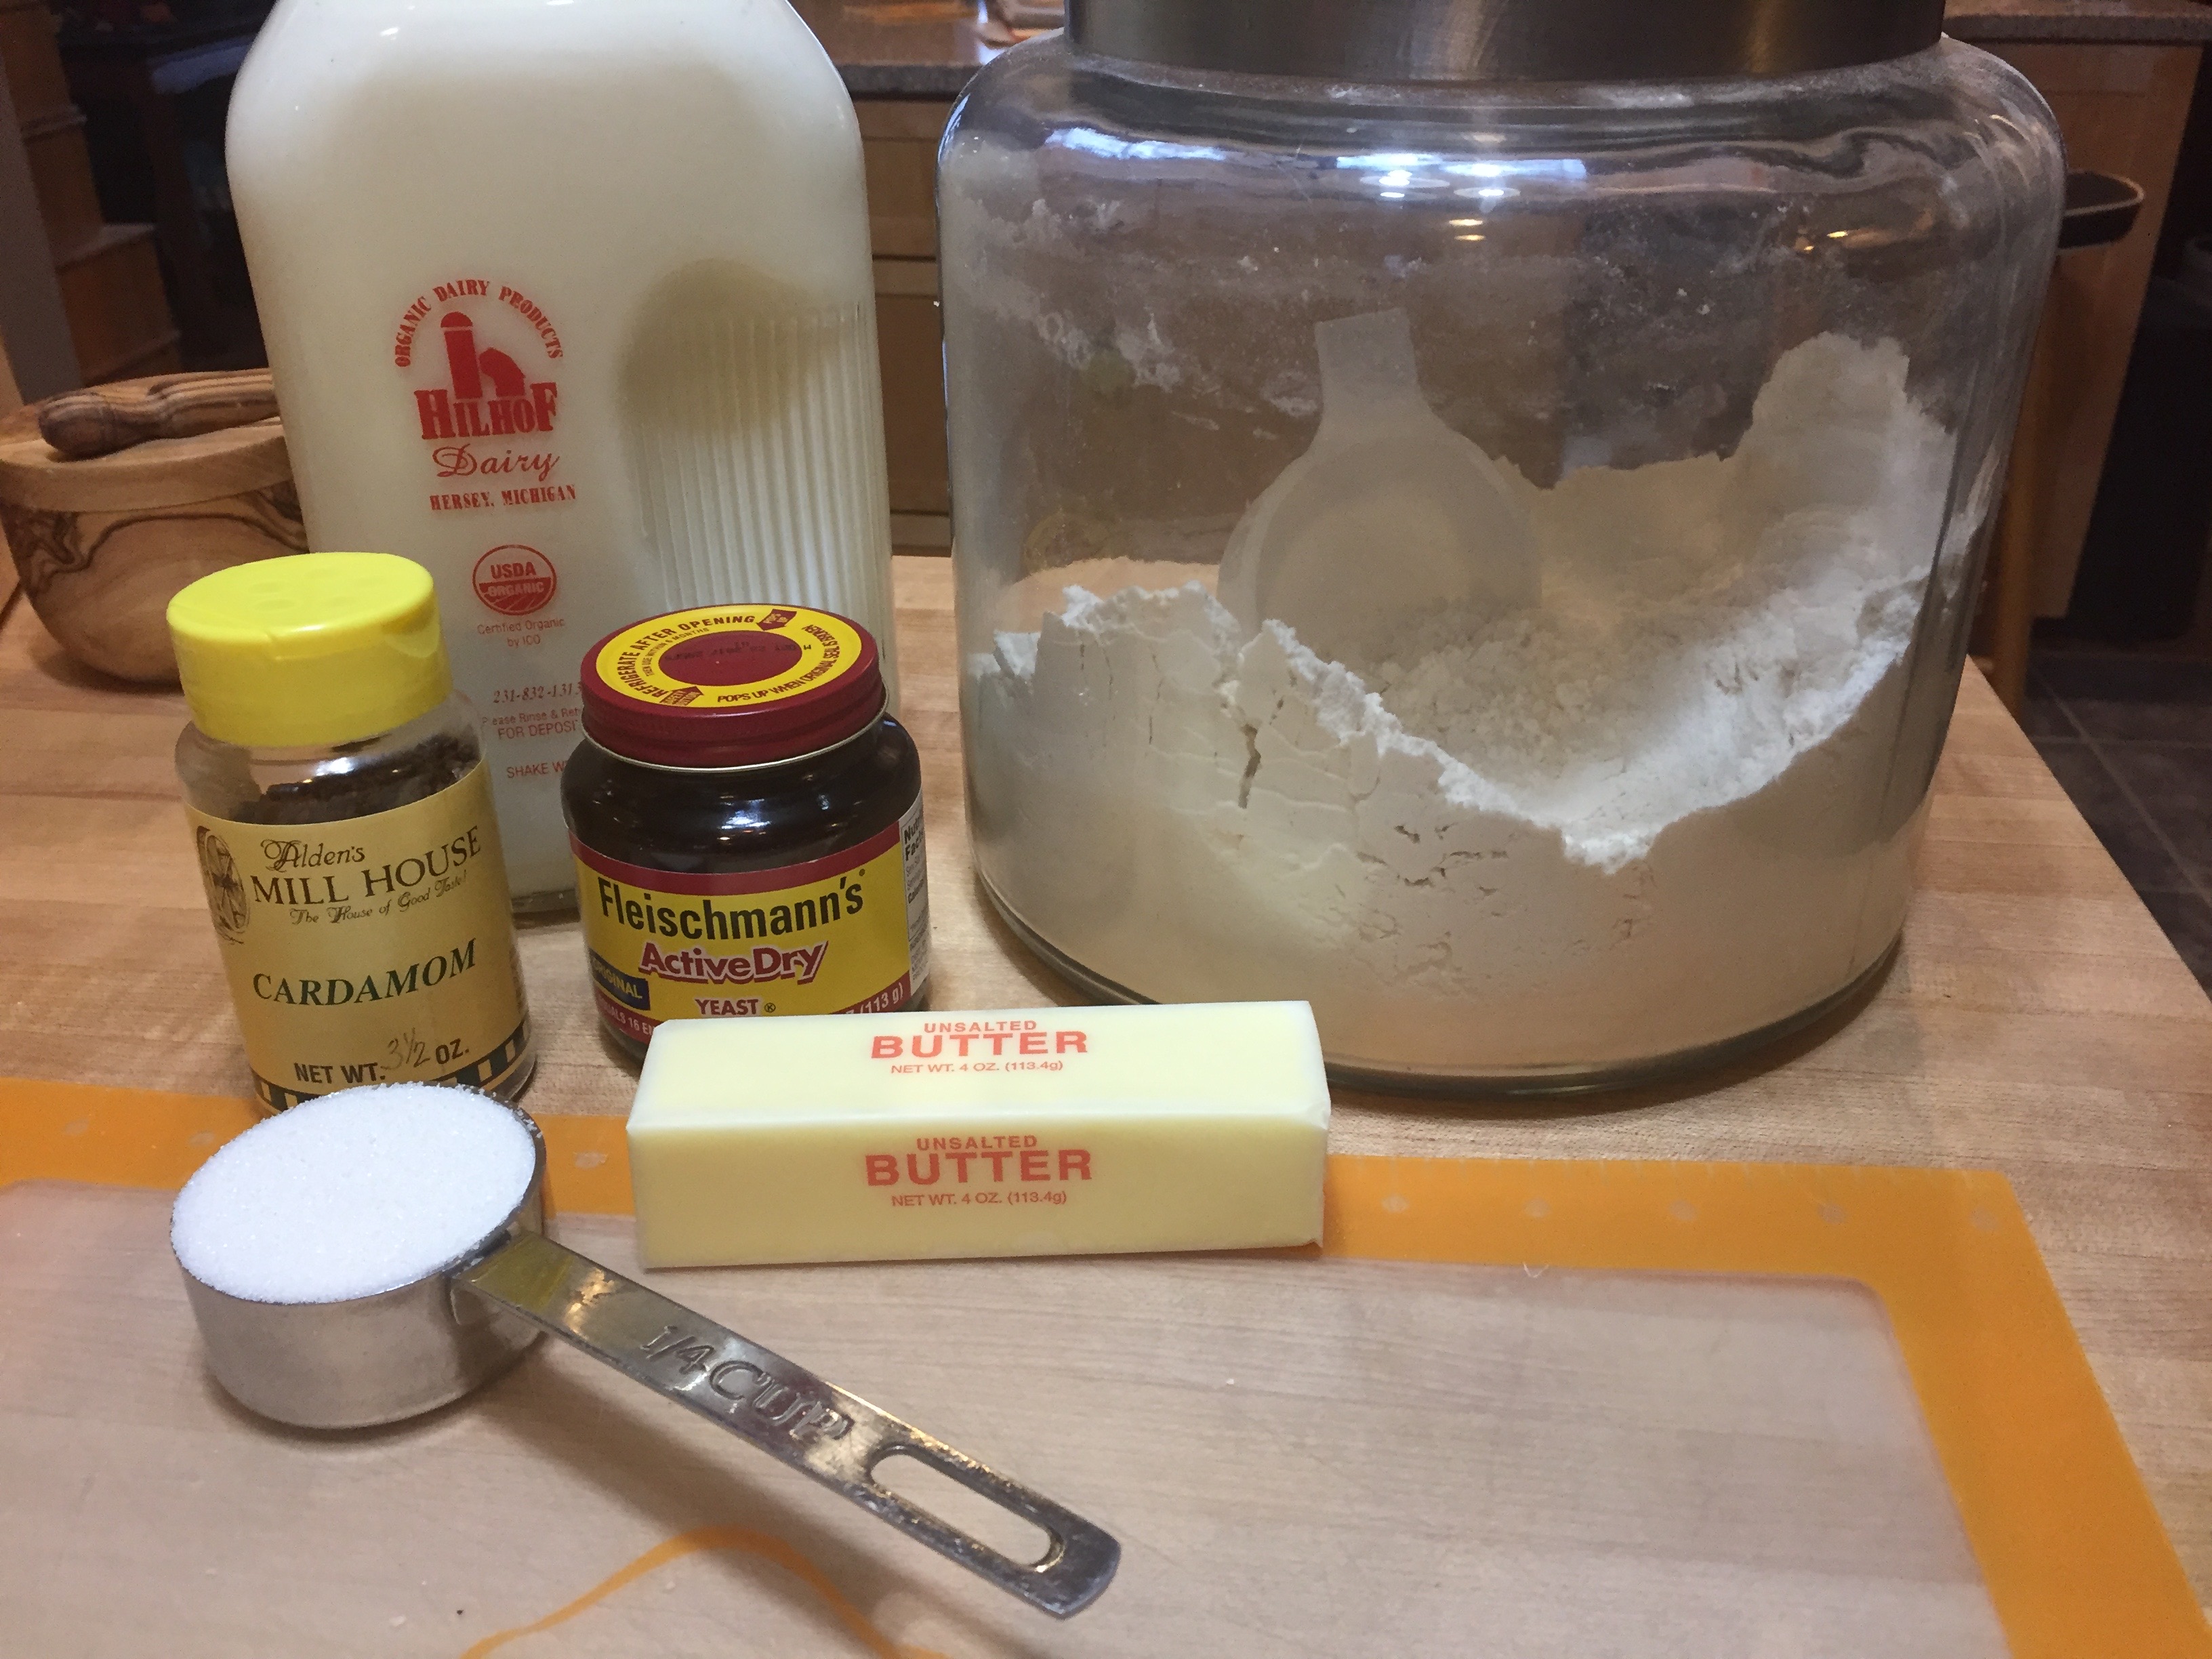
Ingredients for the Dough:

7 T unsalted butter

1 1/2 cups whole milk heated to 115

2 tsp active dry yeast

4 1/2 cups AP flour

1/4 cup sugar

1 1/2 tsp cardamom seeds, lightly crushed

1/4 tsp kosher salt

img_5117

Ingredients for Filling:

1/2 cup granulated sugar

7 T unsalted butter softened

1 T ground cinnamon

1 1/2 tsp cardamom seeds, finely crushed

img_5119

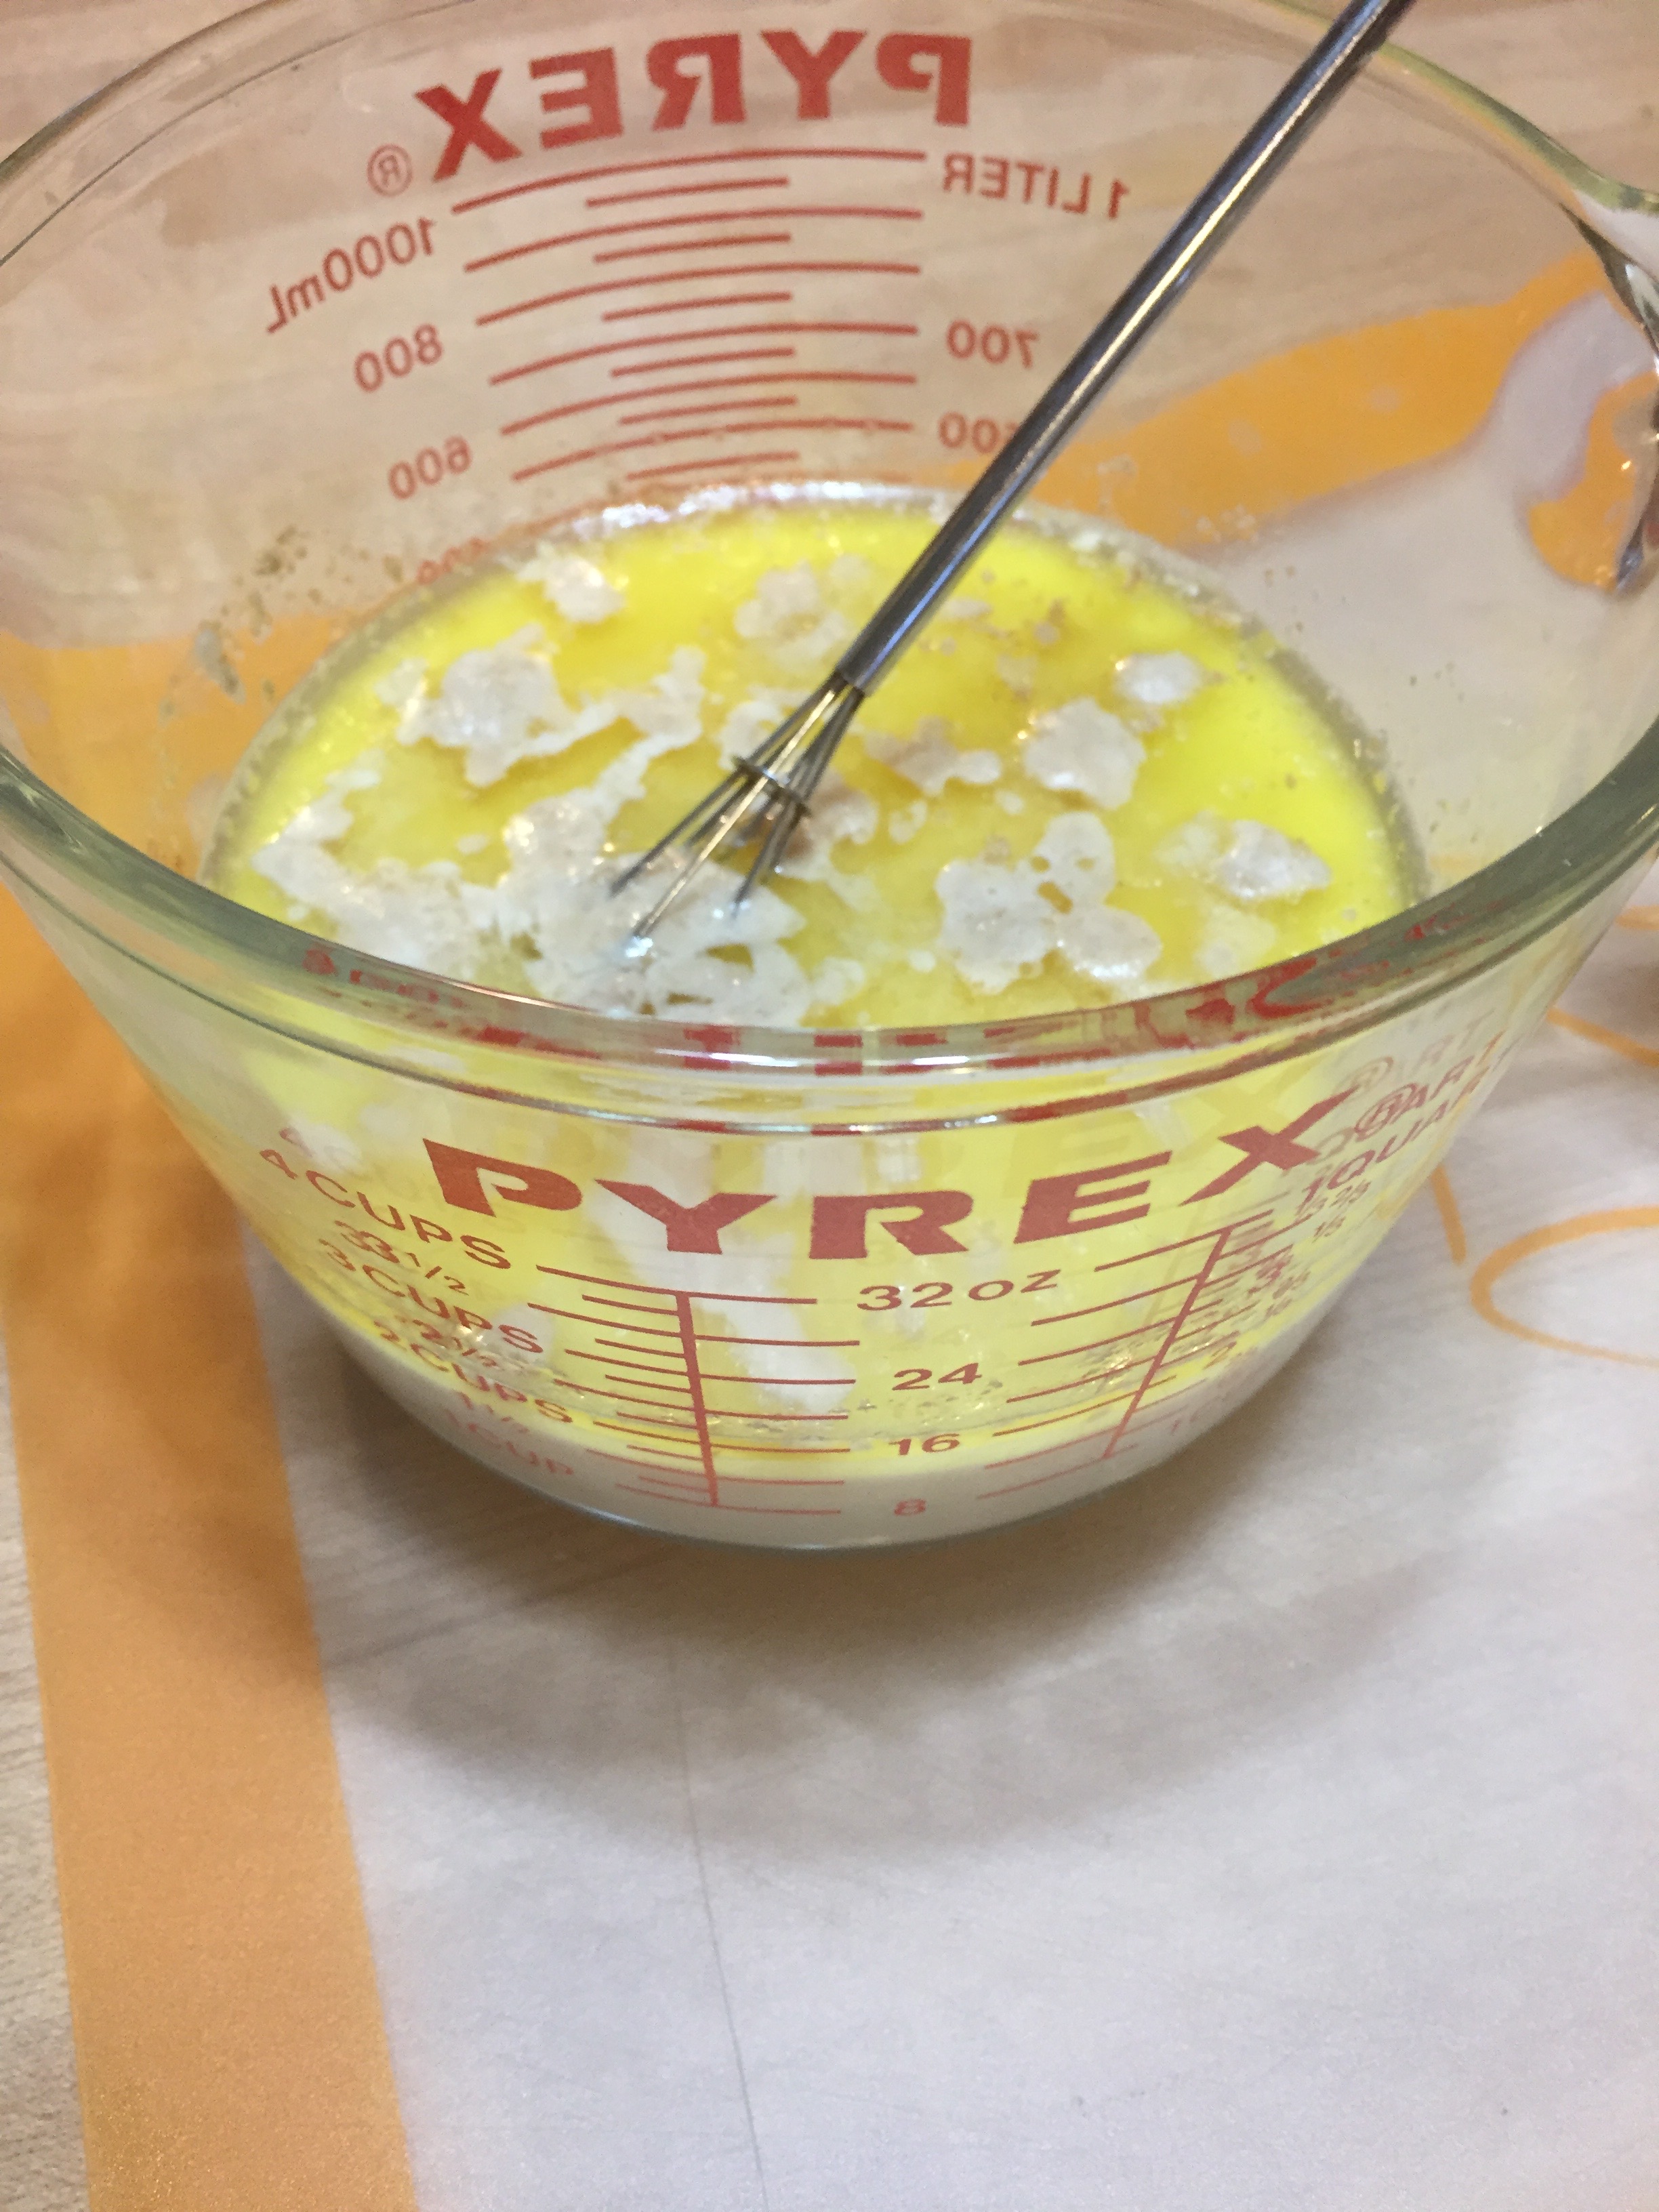
To make the dough heat the milk to 115 degrees.  Use a thermometer unless you’re a lot better than I am at estimating temperatures and you don’t want to kill your yeast.  Melt the butter and add the butter and yeast to the warm milk.  Stir and let it sit until foamy, about 10 minutes.

img_5120 img_5111

In a large bowl whisk together the flour, sugar, cardamom and salt.  Stir in the yeast mixture until dough forms.

img_5113

Transfer dough to a lightly floured surface and knead until smooth and elastic, about 3 minutes.  Or knead in your stand mixer.  Transfer the dough to a lightly greased bowl, cover with a clean dish towel, and let sit in a warm place until the dough doubles in size.  About an hour.

img_5118img_5121

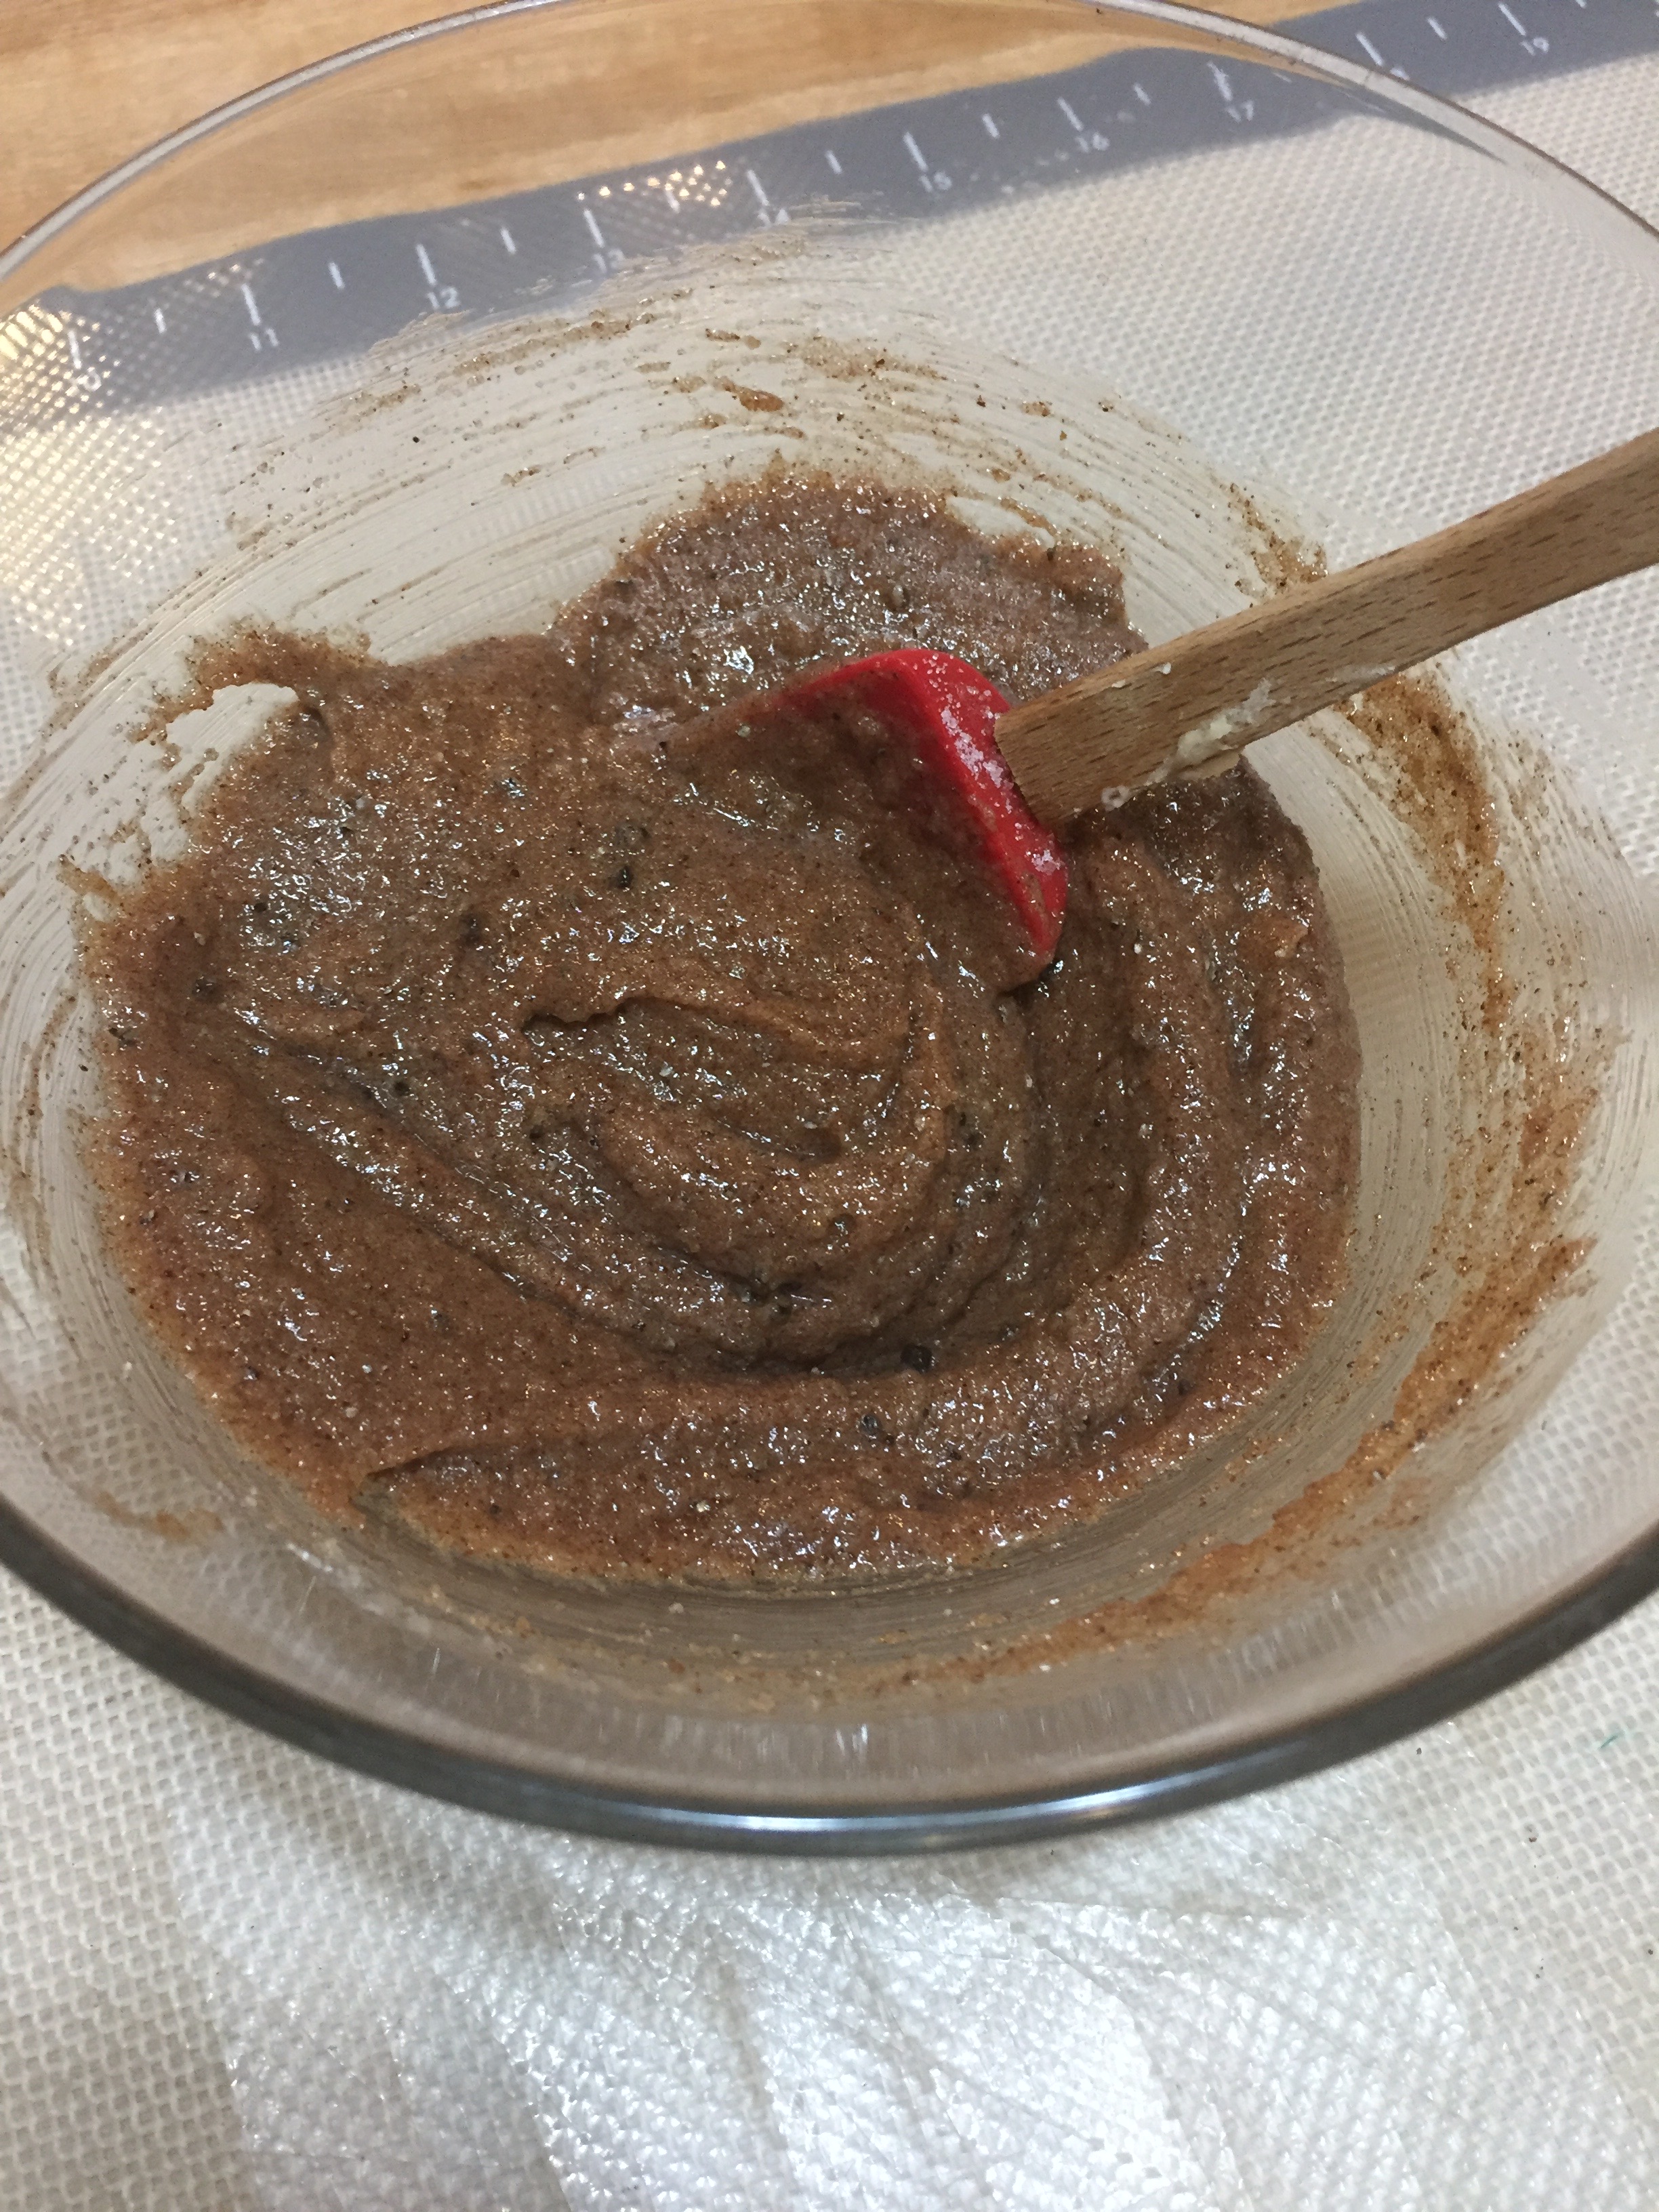
Prepare the filling stirring together the softened butter, sugar, cinnamon and cardamom seeds.

img_5123 img_5122

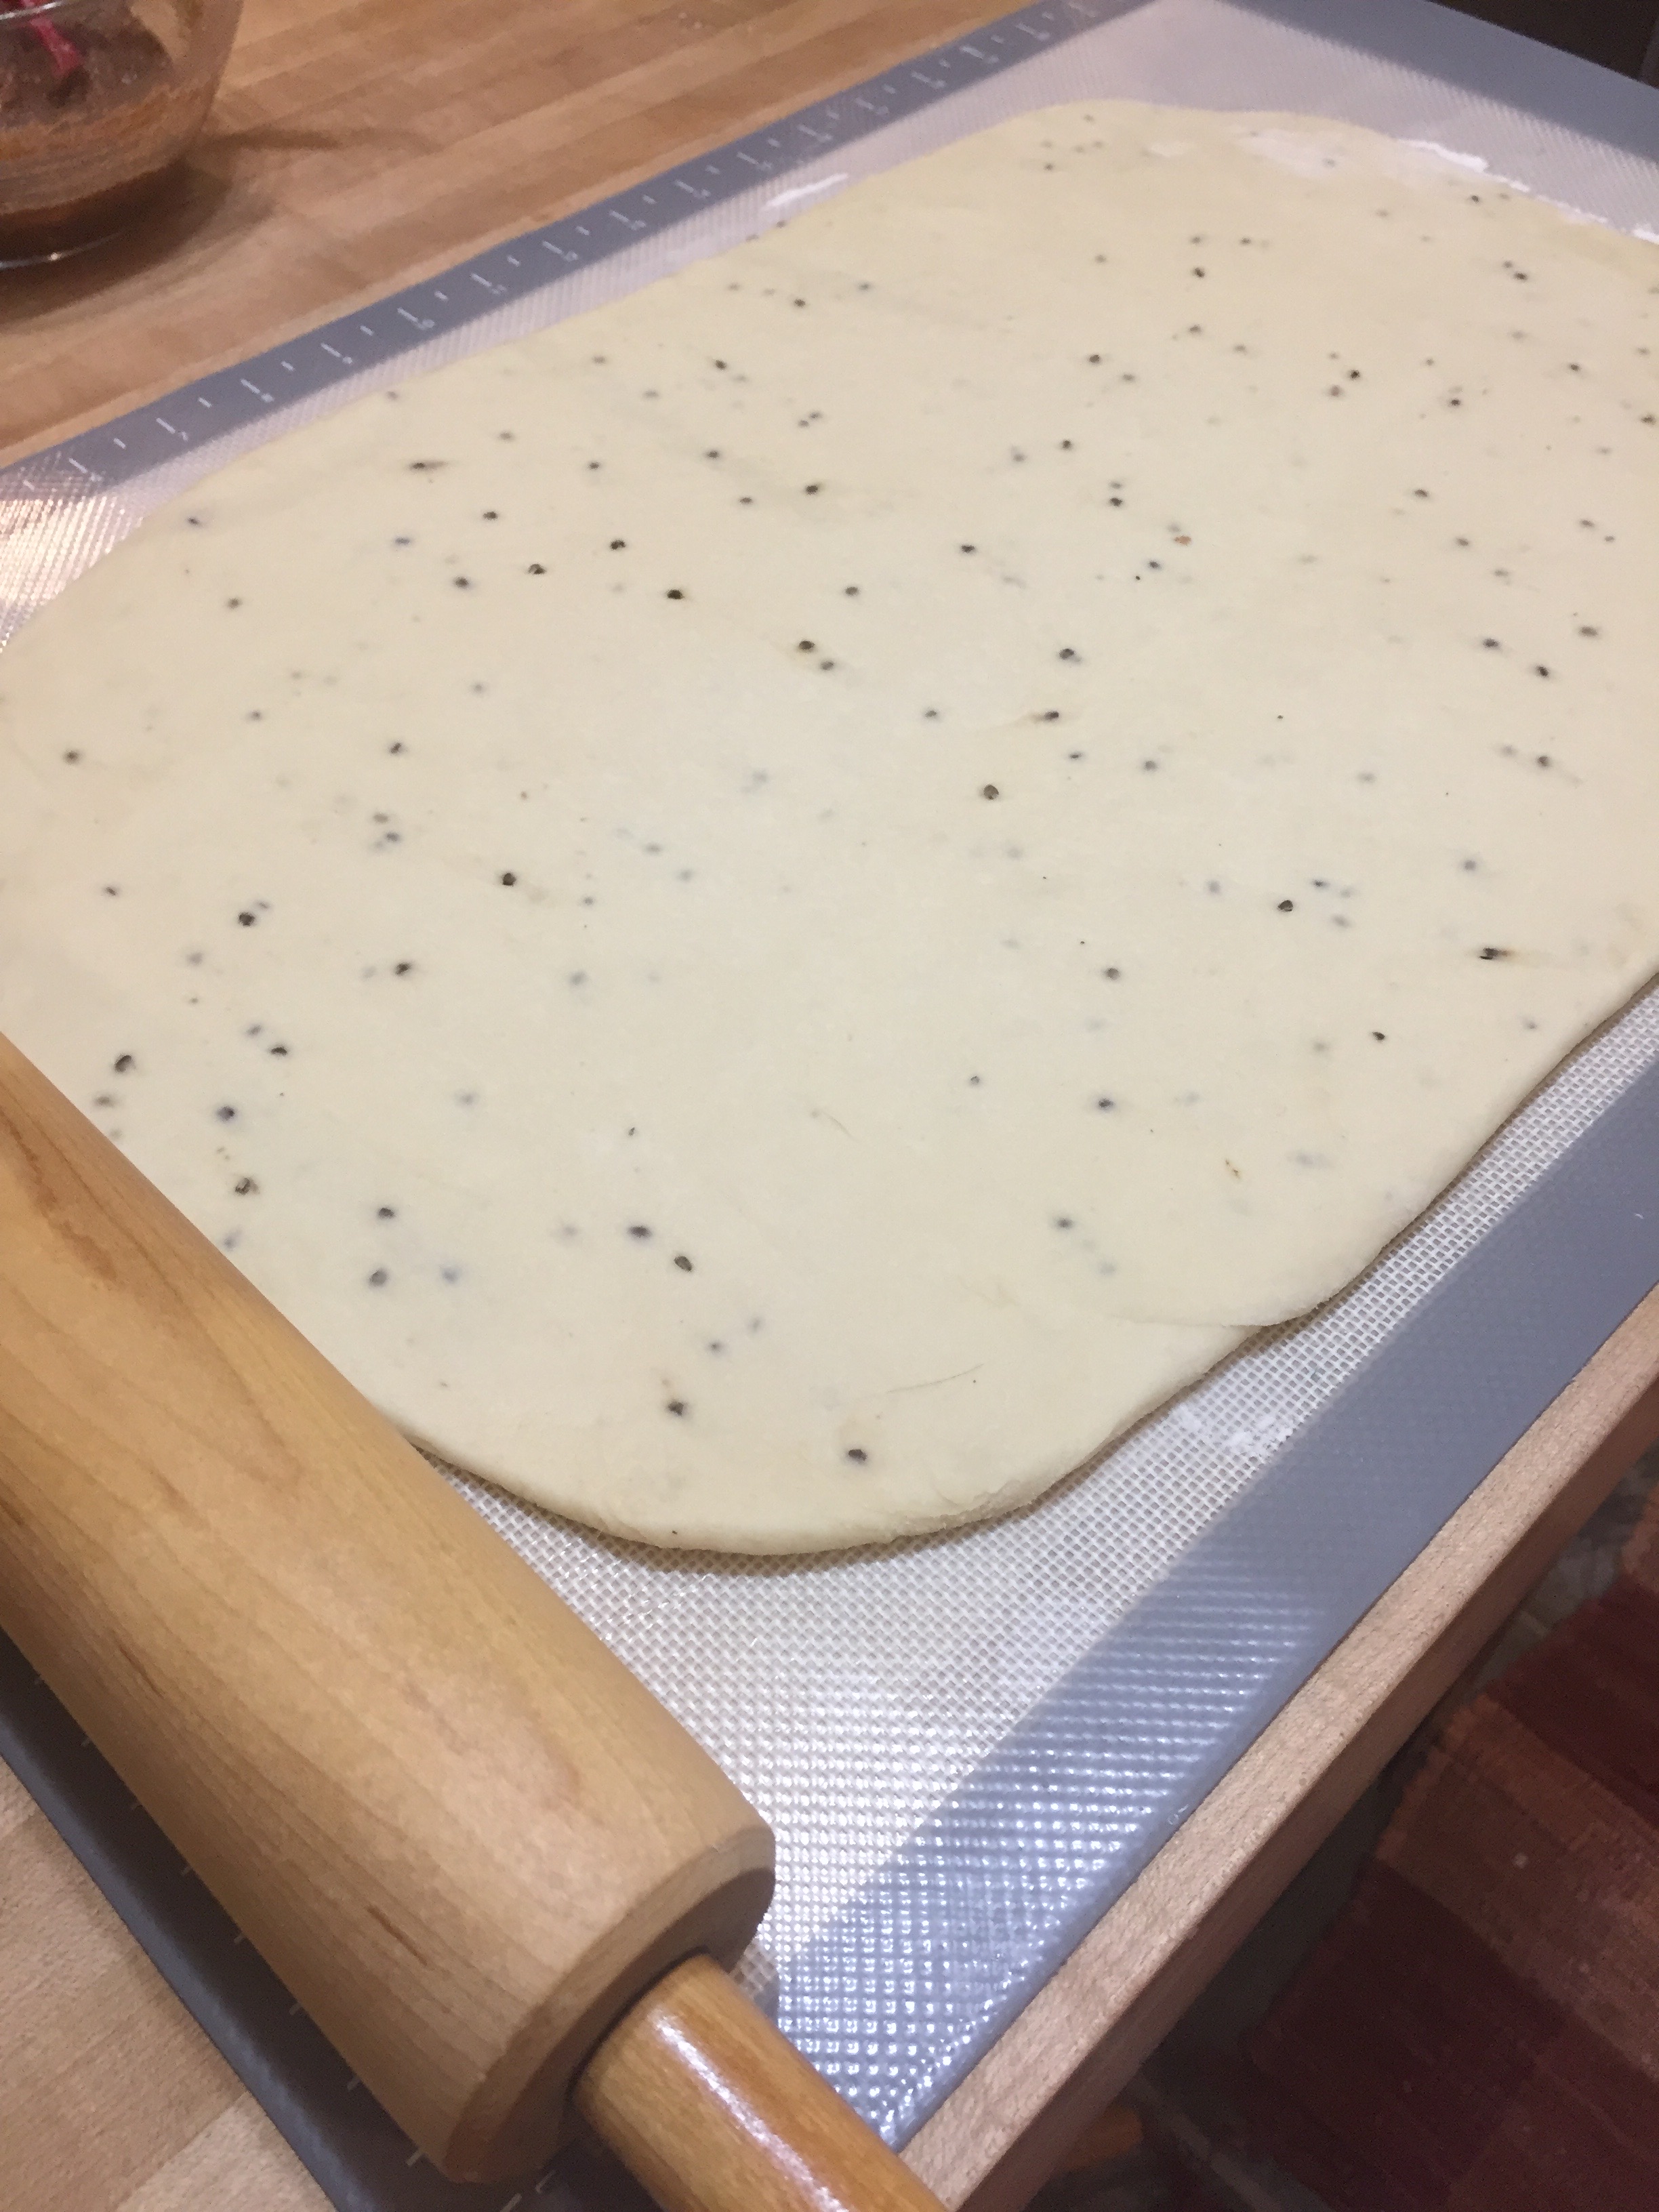
On a lightly floured surface roll out the dough into approximately a 11×17 rectangle, about 1/4 inch thick.

img_5125

Spread the filling over the dough.

img_5126

Working from one of the long sides, roll dough into a tight cylinder and transfer the dough to a parchment lined baking sheet.  Cover with a dish towel and allow it to sit in a warm place until the dough has doubled in size.  About 45-60 minutes.

img_5127

Heat the oven to 375.  Using kitchen shears and starting 1 inch from the ends of the dough, make crosswise cuts spaced 1 inch apart, three quarters of the way through the dough.  Now this is where it got tricky for me and my bread looks a little crude.  The recipe says to fan dough slices away from the center, alternating left to right.  Huh?  The center?  Maybe I was supposed to make this into a circle?  I don’t know for sure because I didn’t have a picture.  But it doesn’t really matter. The fanning does not affect the taste at all.

img_5129

Whisk an egg and brush the dough with the egg wash.

img_5130

Bake for 20-25 minutes until golden brown.  Allow the bread to cool before serving.

img_5138

I made up a little icing with powdered sugar, heavy cream and lemon zest.  Because we like icing.

image

Cut yourself a slice and enjoy.  Great with a hot cup of coffee or tea.

img_5141

NOTE:  The recipe suggests that you use the egg wash and sprinkle with pearl sugar before baking.  Since I was going to ice the bread I did not you the pearl sugar but you may prefer that.  If any of you bake a more attractive loaf please comment with a picture.

Corn Pudding

img_4633

Growing up we had very basic meals.  Meat and potatoes.  Fish.  Homemade bread.  Baked beans.  Simple food.  Most of the vegetables we grew up eating came out of a can.  Canned peas, green beans, corn.  Creamed corn.  This recipe is a little sophisticated creamed corn nostalgia.  I came across this recipe some time ago and recently bought the ingredients to give it a try.

Ingredients:

1 can creamed corn

1 can corn, drained

1 box jiffy cornbread mix

2 large eggs

1 stick of butter melted

3 cups shredded sharp cheddar cheese

1 cup sour cream

img_4625

These ingredients reminded me a bit of making cheesy potatoes which everyone loves.  Cheese, butter, sour cream.  Sound familiar?  I also noticed when I took my Jiffy Mix out of the pantry that is was “vegetarian” corn muffin mix.  What’s in the non-vegetarian corn muffin mix I wonder??

Preheat the oven to 350.

In a large bowl whisk the eggs.  Stir in the two cans of corn and the melted butter.

img_4626 img_4627

Stir in the sour cream and the Jiffy Mix.  Stir in 2 cups of the cheese.

img_4628 img_4629

Grease a casserole dish and pour in the corn pudding.

img_4630

Bake for 40 minutes.  Remove from the oven and sprinkle with the remaining cup of cheese. Return it to the oven and bake for another 5-10 minutes.

img_4631 img_4632

I served this as a side with marinated flank steak and haricot vert.  Haricot vert is a French name for slender, sweeter green beans with small seeds.

img_4634

Its a really good thing that my husband liked the corn pudding because the steak was flavorful but extremely “chewy” and, as far as he’s concern, a green bean by any other name is still a green bean.

I have another recipe, which I’ll also include here, that I got from an aquaintence over 40 years ago.  I have not made this recipe in years but I prefer it because it is less sweet, more savory.  But you can try both and judge for yourself.

Scalloped Corn

Ingredients:

1 can creamed corn

1 cup crushed saltine crackers

1/2 cup diced celery

1/4 cup diced onion

1 cup sharp cheddar cheese

1 tsp salt

2 beaten eggs

2 T melted butter

1 cup whole milk

Combine all ingredients, pour into a greased casserole dish and bake at 325 for 40 minutes.

You must admit, this recipe sounds marginally healthier.

This will probably be my one and only creamed corn post.  If any of your are feeling a little nostalgic try one of these recipes.

Paella In My Paella

img_4540

Paella is a Spanish dish made with rice, and a variety of meat (chicken or rabbit), seafood (shrimp, mussels or a firm fish like cod), and spicy sausage like andouille or chorizo.  It also includes vegetables like green beans or peas and spices like paprika and saffron.  This dish allows for countless variations.  The rice is supposed to be cooked in such a way that it crisps up on the bottom and edges.  It’s frequently prepared over an open fire or a very high burner.  Every summer we attend a music festival in northern lower Michigan where huge iron paella pans are set over an open flame and enough paella is being prepared to feed dozens and dozens.  It’s almost as much fun watching them make it as it is eating it.  They make a vegetarian Paella as well making them a very popular stop.  Paella cooked in this fashion allows for nicely crisped rice.  Personally, I prefer my rice without the crisp so that’s the way I prepare it.

This post, however, is as much about my new pan as it is about the paella.  Interestingly, the word “paella” derives from the Old French word paella for pan which in turn comes from the Latin word patella for pan.  (I didn’t happen to know that off the top of my head but I do know how to access all things Wikipedia.)  I frequently stop and browse in shops that sell  Le Creuset cookware.  Le Creuset is a French company that makes enameled cast iron cookware.  I have several knock-off enameled cast iron pieces which I use all the time but have never purchased a Le Creuset.  Until now.  I am still excited!  My husband gifted it to me so I promised to, appropriately, make paella my first dish in this beautiful 5 quart Braiser aka Paella or Patella.

img_4621

A thing of beauty, no?!

This recipe makes a generous amount.  Although the leftovers were great I probably will not  make this again until we have guests.

Ingredients:

Herb Blend

1 cup chopped fresh parsley and cilantro

2 or 3 large cloves of garlic minced

juice of one lemon

1 T olive oil

Paella

1 cup water

1 tsp saffron threads

5 cups chicken broth

1/2 pound unpeeled jumbo shrimp

4 boneless, skinless chicken thighs

4 links andouille sausage

3-4 slices of thick bacon cut into 1 inch pieces

2 cups finely chopped onion

1 cup finely chopped red bell pepper

1 cup canned diced tomatoes undrained

1 tsp sweet paprika

3-4 cloves of garlic whole

3 cups Arborio rice

1 cup frozen peas

1 lemon juiced

img_4526

Combine the first 4 ingredients and set aside.  Combine the water, broth and saffron in a large saucepan and bring to a simmer.  Do not boil.  Keep warm over low heat.

img_4527 img_4528

Heat 1 T of olive oil in large heavy skillet over medium high heat.  Add the chicken pieces and saute 2-3 minutes per side.  Remove them from the skillet and set aside.  Add the sausage and bacon to the skillet and saute 3-4 minutes.  Remove them from the skillet.

img_4530 img_4531

Reduce the heat to medium low and add the onion and bell pepper.  Saute for approximately 15 minutes stirring occasionally.

img_4529 img_4532

Add the tomatoes, paprika and garlic and cook for 5 more minutes.

img_4533

Add the rice and cook for 1 minute stirring constantly.  Stir in the herb blend and the peas.

img_4535 img_4536

Add the broth mixture, chicken, and sausage mixture and bring to a low boil.  Cook 15 minutes, stirring frequently.

img_4537

Once the meat is added this 5 quart pan is VERY full.  Be careful.

img_4538

Add the shrimp and cook 5 more minutes.  Most of the liquid should be absorbed.  Remove from the heat, sprinkle with the juice from one lemon, cover, and allow the paella to sit for 10 minutes.  If your skillet doesn’t have a lid cover the paella with a clean dish towel.

Serve with lemon wedges.

NOTE:  Like I mentioned earlier, this recipe is perfect for modifying based on personal tastes.  I would love to use mussels but availability is an issue.  I may try this next with strictly seafood and substitute seafood broth for the chicken broth.  My husband likes foods kicked up and he added hot sauce to his.


Pierogi

fullsizerender

Some very special neighbors have, on several occasions, given us homemade pierogi which are amazing.  They make them around the holidays and freeze them.  We have also gotten pierogis and sausage from a Polish Market in Hamtramck, MI that have been excellent.  And, of course,  there are always frozen pierogis that you can pick up at most grocery stores in the freezer section.  Eating the pierogi made by our friends and savoring every bite inspired me to take a stab at making my own.  They were actually quite fun to make.  The dough is easy to work with.  Easier I think than pasta dough.  And, like ravioli, the filling possibilities are only limited by your imagination.  Sauerkraut, cheese and potato are pretty standard but you can make variations on those as well as stuffing the little dough rounds with fruit or meat.  This year for our after Thanksgiving family get-together I decided to go Polish.  We had Polish sausage with my homemade sauerkraut, cabbage rolls (golabki), buttery mashed potatoes, applesauce, pickles, and, of course, pierogi.  A feast for sure.  Nearly every bite was devoured.  There were no leftovers to put away.  Next year my Dad wants us to do Finnish.  So stay tuned.

Dough Ingredients:

2 cups AP flour

1/2 tsp salt

1 large egg

1/2 cup sour cream

4 T butter at room temperature

img_4271

Mix the salt and flour together in a bowl.  Add the egg to the flour mixture and stir.  The dough will be clumpy.  Work in the sour cream and soft butter until the dough comes together in a slightly sticky ball.

img_4272 img_4273

Knead and fold the dough without adding additional flour until the dough is less sticky but still moist.  Wrap the dough in plastic wrap and refrigerate for 60 minutes or so.  While the dough is chilling prepare your filling.

Filling Ingredients:

1 cup warm mashed potatoes

1 cup sharp cheddar cheese

Stir the potatoes and cheese together until the cheese melts, season with salt and pepper and set aside until the filling is cool to the touch.

Now it’s time to roll out your dough.  Divide the dough ball in half and roll out on a lightly floured surface to about 1/8th inch thickness.  Cut rounds using a biscuit cutter or a glass dipped in flour.

img_4277 img_4278

Place a couple teaspoons of the potato cheese mixture on each round.  Gently fold the dough over to form a pocket around the filling.  Pinch the edges to seal and reinforce using the tines of a fork.

img_4279 img_4280

Now you’re ready to either freeze your pierogi or cook them in a large stockpot of boiling salted water.  Only cook a few pierogi at a time so they aren’t crowded.  When they float to the top they are done, about 10 minutes.

img_4415 img_4416

In a large heavy skillet melt a few tablespoons of butter and sauté onion or shallots just until they begin to brown.  Add the drained pierogi and cook until they are browned on both sides.

img_4418

Serve them hot with sour cream or applesauce.  Enjoy!

Seriously. How can something made from butter, sour cream and flour, stuffed with cheesy mashed potatoes and fried in more butter possibly be bad????

NOTE:  I also filled some with a sauerkraut, mushroom and sour cream mixture.  Drain the sauerkraut and saute along with finely diced mushroom in a little butter.  Remove from the heat, stir in a little sour cream and season with salt and pepper.  Allow the mixture to cool before filling the pierogi.

I’m looking forward to making these again soon.

Raspberry Pie and Pumpkin Pie

img_4265 img_4274

Every Thanksgiving I make a raspberry pie because it is both my Dad and my daughter’s favorite.  And I make a pumpkin pie because I happen to like pumpkin pie and because I just think pumpkin pie is mandatory at Thanksgiving.  The pie on the left was amazing!  The pie on the right.  Well that’s another story.  But I need to backtrack a bit to the crust.  A good crust is the secret to a good pie.  The crust recipe I have is from a dear family friend, Peg Johnson.  She graduated from Michigan State University with a degree in Home Economics.  She has passed away but she lives on in the margins of my Better Homes and Gardens Cook Book.  Penned on page 230, at the top of the Pastry section, is her recipe for Never Fail Pie Crust.

img_4252

Remember this book?  I see it in antique stores all the time.  I got mine as a gift in 1971.  It has a burn mark on the back cover and some of the pages stick totgether but I still use it.

Never Fail Pie Crust

3 cups AP flour

1 1/4 cups shortening

1 tsp salt

1 egg well beaten

5 T cold water

1 T white vinegar

img_4245

Cut the shortening into the flour.  Peg used a pastry cutter.  I use my food processor.

img_4247

Combine the beaten egg, water and vinegar.  Pour liquid into flour mixture all at once.  Blend with a spoon until flour is well moistened.

img_4248 img_4249

Divide the dough into 3 equal discs.  The dough can be rolled out immediately or can be kept in the refrigerator for up to 2 weeks.

img_4251

You might be able to get four crusts from this recipe but I give myself a little wiggle room for bad edges or other rolling difficulties.  Roll the crust out on a lightly floured surface and line the bottom of the pie pan with the crust.

Preheat the oven to 350.

img_4256 img_4257

Raspberry Filling:

6 cups raspberries

1 1/2 cups white sugar

2 T cornstarch

2 T tapioca

2 T butter

img_4253

Combine the raspberries, sugar, cornstarch and tapioca in a large bowl and gently stir.  Allow them to sit for 10 minutes or so.  Pour the berries into the prepared pie crust.  Cut butter into small pats and put on top of the raspberry filling.

img_4254 img_4258

Roll out the top crust, cut slits with a paring knife,  and crimp the edges.  Sprinkle with a little white sugar.  Bake for 50-55 minutes until the fruit is bubbly and the crust is golden brown.  To avoid drips in your oven put the pie on a cookie sheet lined with foil.

img_4260 img_4264

Mmmmmmm.  This pie was great!  Served with a little whipping cream or a scoop of vanilla ice cream.

img_4300

Now let’s talk about that pumpkin pie.  I had purchased a couple of little sugar pumpkins that I used for fall table decorations and decided to make them into my traditional pumpkin pie.  Waste not, want not.

img_4238 img_4239

As I was seeding these little babies and getting them ready to roast to fork tender goodness in the oven my dad said, can’t you buy pumpkin in a can?  I said, of course I can but this will be homemade.  From scratch.  It will be better than pumpkin in a can!  I should have listened to my dad and retrieved a can of pumpkin from my pantry.  Mistake number one.

Preheat oven to 400.

Pumpkin Pie Filling

2 cups pumpkin

12 oz can evaporated milk

2 beaten eggs

3/4 cup brown sugar

1 1/2 tsp cinnamon

1 1/2 tsp ginger

1 1/2 tsp nutmeg or mace

1 tsp cloves

1 T flour

img_4266

Quarter the pumpkins, scrape the seeds and arrange on a baking sheet lined with foil or parchment.  Bake at 350 for 45-50 minutes or until fork tender.  Once the pumpkin is done scrape the meat into a bowl and discard the skins.

img_4255 img_4261

Purée the pumpkin in a food processor.

img_4262 img_4263

Doesn’t this look beautiful!??  Mistake number two.  I should have tasted the pumpkin at this point.  But I did not.

Combine the pumpkin with the egg, evaporated milk, brown sugar, flour and spices and whisk together until well combined.  Pour into the prepared crust.

img_4268 img_4270

I had scraps of crust left over so I copied a friend’s idea and cut little leaves out with a cookie cutter and lined the edge.  I actually had to add the fancy crust pieces part way through the baking process because the filling is too runny initially.  Bake for 40 minutes or until a knife inserted 1 inch from the crust comes out clean.

img_4275

There is no picture of this pie on a plate with whipping cream.  I ate a small slice and proclaimed it too awful for human consumption.  However, this is a good recipe for pumpkin pie provided that you use 2 cups of canned pumpkin.  Next year I’ll listen to my Dad.

NOTE:  In the future I will use my little sugar pie pumpkins for table decorations only and I will use Libby’s pumpkin for my pie.


Sugar and Cinnamon Glazed Nuts

img_4448

My friend Georgia and I have gotten together in December for a baking marathon for over 30 years.  We have several cookies and candies that are staples each year.  Friends and family  have their favorites and we try to keep everyone happy.  But we also like to change things up a little.  Try something new.  This year we decided to omit one of our standard cookies (thumb prints) and make these candied nuts.  We are both very glad that we did!  They are easy to make and the house smells amazing while they’re in the oven.

Ingredients:

2 pounds of nuts (almonds, walnuts, pecans, cashews)

2/3 cups of melted butter

2 cups sugar

3 T cinnamon

2 tsp salt

4 egg whites

1 tsp vanilla

Preheat your oven to 250.  Beat the egg whites with the salt until they are frothy.  Gradually add in the vanilla and sugar and continue to whip until stiff peaks form.  Gently fold in the nuts and the cinnamon.  You can use a wooden spoon or your hands making sure that the nuts are all coated.  Add the melted butter and stir to coat.  It will look like a mess.  And you’ll wonder if I omitted an essential ingredient or a step in the process.  Have faith.

Pour the nuts out onto a baking sheet covered in parchment paper.  I used a large jelly roll pan with sides. Place in the oven and bake for one hour stirring every 15 minutes.  This is when the kitchen starts to smell really amazing.

Pour the nuts out onto parchment paper or foil to cool.  Store in zip lock bags or sealed containers.  Enjoy!

We used almonds and walnuts because that is what we had but I think pecans and cashews would also be excellent.

NOTE:  Recipes for most all of our standard cookies are on my blog under Christmas Cookies.

Cauliflower Soup with Cudighi

img_4388

It’s very cold in Michigan.  Perfect weather for soup.  The secret ingredient in this soup is cudighi.  Cudighi is Italian sausage that originated in the Upper Peninsula of Michigan.  Most specifically it is said to have been invented by Italian immigrants in Ishpeming Michigan which happens to be where I was born.  Cudighi is made using pork butt and dry red wine, garlic, cinnamon,  nutmeg, clove and allspice.  The cudighi I used came from a little Co-op in my hometown of Chatham Michigan.  This sausage is very versatile.  It is excellent in spaghetti sauce or lasagna, formed into paddies and fried for a sandwich, mixed with ground beef for meatloaf or meat balls, as a pizza topping.  Your only limits are you imagination and, of course, your ability to access cudighi in the first place.  It might just be worth a trip to the Upper Peninsula of Michigan to score a few pounds.  Or Vollwerths cudighi can be shipped from U.P. Foods in Lake Linden (info@upfoods.com).  If a trip to the UP or waiting for a sausage shipment seems like too much trouble, substitute with a good  Italian sausage available closer to home.

Ingredients:

1 pound cudighi (or Italian sausage of your choosing)

1 head of cauliflower

3-4 stalks of celery rough chopped

2-3 carrots sliced

3 leeks, white and light green parts, sliced

4-5 cloves of garlic diced

2 medium russet potatoes rough chopped

1 poblano pepper seeded and rough chopped

4 cups chicken broth

4 T flour

4 T butter

2 cups half and half or whole milk

1 cup shredded sharp cheddar cheese

salt and pepper to taste

img_4371

In a dutch oven cook the Cudighi over medium heat until it is no longer pink.  Drain and set aside.

img_4373 img_4376

While the meat is browning prep all of the vegetables.  Slice the leeks and soak them in water.  Leeks tend to hold sand and you don’t want grit in your soup.

img_4372img_4377

Wash and cut up the poblano, celery and carrots.

img_4374

Peel and dice the potatoes and cut the cauliflower into flowerettes.

img_4380 img_4381

Once the cudighi has been browned and set aside add the carrot, celery, and leeks to the drippings and sweat the vegetables over medium heat 3-4 minutes.  Add in the leeks and garlic and continue to cook for 3-4 minutes.  If necessary add a little olive oil.

img_4375 img_4379

Add the potato, cauliflower and broth to the kettle.  Season with salt.  Bring to a boil.  Reduce the heat to a slow simmer, cover the kettle and cook until the vegetables are all tender, 30-40 minutes.

img_4382

While the vegetables are simmering make a white sauce in a heavy sauce pan.  Melt 4 T of butter and whisk in the flour over medium heat.  Slowly add the milk continuing to whisk until the mixture starts to thicken.  Remove from the heat and whisk in the shredded cheese.

img_4383 img_4384

Once the vegetables are fork tender purée using an immersion blender.  The consistency is a matter of personal taste.  You can leave some chunks in the soup or purée until smooth.  Once you’ve done the blending add the cheesy white sauce to your dutch oven as well as the sausage.  Add salt and fresh cracked pepper to taste.  Stir and bring to a simmer.

img_4385 img_4386

Garnish with additional shredded cheese, green onions and cilantro.  And homemade garlic croutons.

img_4387

Ladle into serving bowls and enjoy!

NOTE:  Fresh parsley or basil leaves sliced, shredded Parmesan or Asiago cheese,  or some chopped roasted red pepper would all make excellent garnishes for this soup.  Great served with a slice of good sourdough bread that you can use to clean your bowl.

I happen to think that soups are one of those things that taste a little better the second day.  We will be eating this soup for lunch tomorrow.

Pumpkin Cake

img_4066

Halloween costume parties at our house are a tradition that we all enjoy.  The past few years my friend Jane and I have baked and decorated a centerpiece cake.  And we have such a good time doing it.  This year we used a recipe for a Pumpkin/Carrot/Spice cake from Women’s Day to make our pumpkin.  This pumpkin required two bundt cakes.  And a LOT of cream cheese icing…1 cup of butter and 4 8-oz packages of cream cheese.  Each of us used the recipe and baked a cake the day before we put them together.

img_4036 img_4056

First step after baking is to cut each of the cakes in half horizontally.  And start stacking and icing.

img_4055 img_4059

We used some long toothpicks to secure the layers.

img_4060

The top is on and you’re thinking it looks nothing at all like a pumpkin!  We put the cake in the refrigerator for 30 minutes or so to help set the icing up.  With the pedestal plate and 2 bundt cakes stacked it required a bit of refrigerator rearranging but I think the chilling helped.  We covered it with a light base coat and, once again, returned it to the refrigerator for another 30 minutes.

img_4061

A second coat of icing and it’s starting to look like a pumpkin.  We used the stem from a real pumpkin supported by a couple of small dixie cups stacked in the center and held in place by icing.

img_4064

And there you have it.  Ta Da!!  A perfect pumpkin.  Two years ago we did a caramel apple.

img_4072

Last year we made a brain.   That was great fun to do as well!

img_4038

But I think this year our guests will find the pumpkin much more appetizing.  Happy Halloween.

Chicken Soup with Vegetables and Orzo

img_3923

I baked a roasting chicken one night and used the rest of the chicken for soup the next.   You could also shred half of a grocery store rotisserie chicken.  In less than an hour you will have a perfect comfort food that is hearty and full of vegetables and chicken.  And it can be easily modified based on your personal preferences and/or what you have in your refrigerator.  We all know that chicken soup cures what ails you no matter what’s in it.

Ingredients:

1 cup of onion rough chopped

1 cup of celery rough chopped

1 poblano pepper diced (seeded if you want to keep the heat down)

1 cup of carrots sliced

2 cloves of garlic minced

2 T olive oil

6 cups of chicken broth

1 can hominy drained and rinsed

2 cups baby spinach

1/2 cup each of fresh parsley and fresh cilantro

zest and juice of one lemon

1/2 cup uncooked orzo

salt and pepper to taste

img_3909

In a heavy kettle or dutch oven heat the olive oil over medium high heat and sweat the celery, onion, carrots and pepper for about 5 minutes.  Add the minced garlic.  Reduce the heat, partially cover the kettle and cook until the carrots are tender.

img_3910

img_3942

While the vegetables are cooking bring a pot of salted water to a boil and cook the orzo according to package instructions.

img_3918

Drain and rinse the hominy.

img_3912

Add the broth to the vegetables and bring it to a boil.  Cover the pot, reduce the heat and simmer for 10-15 minutes.

img_3919

Drain the orzo reserving some of the pasta water.  Add the orzo, chicken and hominy to the soup.  Simmer until the chicken is heated through.

img_3920

Stir in the lemon zest and juice, parsley and cilantro and the spinach.

img_3921

Stir until the spinach is wilted.  Season with salt and pepper.  If the soup needs more liquid add in some of the pasta water.

img_3922

Ladle into bowls and serve with toasted tortilla strips.

img_3924

Enjoy!!

NOTE:  I love the lemon in this soup but it’s really a matter of personal taste.  You could substitute peas and mushroom for the pepper and hominy.  Serve with a good crusty bread or your favorite crackers.  Cooking the pasta (or rice) prior to adding it to the soup helps to avoid pasta that is overcooked and absorbs all of the broth.


Broccoli Cauliflower Soup

img_3736

A couple weeks ago I experimented with new concoctions for dinners several nights in a row.  The first night that my husband dished up seconds was when I made this soup.  That was a good sign for the soup.  Not so good for the other dishes which I will probably not make again.  Originally I made this soup with just broccoli.  The second time I added cauliflower and made the soup for our good friends.  It was a hit.  ‘Tis soup season now and I’m sure I will make this often using both broccoli and cauliflower.

Ingredients:

2 cups sliced leeks

2 cups of broccoli flowerettes

2 cups of cauliflower

broccoli and cauliflower stems diced

6 cups of chicken broth

6 T butter

6 T flour

3 cups of whole milk

3 cups shredded cheese (I used sharp cheddar and smoked gouda)

1 cup shredded carrots

grated nutmeg

salt and pepper to taste

img_3765

Slice the leeks and broccoli and cauliflower stems.  Rinse them well, especially the leeks which tend to store up a lot of sand.

img_3741 img_3739

Put the leeks and the vegetable stems in a heavy kettle or Dutch oven with about a cup of the broth and cook over medium high heat until they are softened, 10-15 minutes.  Once the vegetables have softened use an immersion blender off heat and purée.  Add the remaining broth and bring to a simmer.

img_3740img_3734

Blanch the broccoli and cauliflower flowerettes.  Drop them into ice water to stop the cooking and set aside.  Grate the carrots.

img_3772 img_3766

Next make a cheese sauce.  Melt 6 T of butter in a saucepan over medium heat.  Whisk in the flour and cook for a couple minutes whisking constantly.

img_3753 img_3743

Slowly whisk in the milk and bring to a simmer.  Gradually add the cheese whisking until it melts.

img_3735

Add the cheese mixture to the broth and vegetables.  Stir in the flowerettes, grated carrot and nutmeg.  Add salt and pepper to taste.

img_3746 img_3760

Simmer until the vegetables are thoroughly heated.  Ladle up and enjoy!  Great served with homemade croutons.

img_3757

NOTE:  I took all of my photos when I made the first batch of soup so you don’t see any cauliflower.  But the cauliflower was a great addition.  Also a little cayenne pepper or Frank’s hot sauce is a tasty add in.  Any good melting cheese can be substituted for the sharp cheddar and smoky gouda.