Bean and Sausage Soup

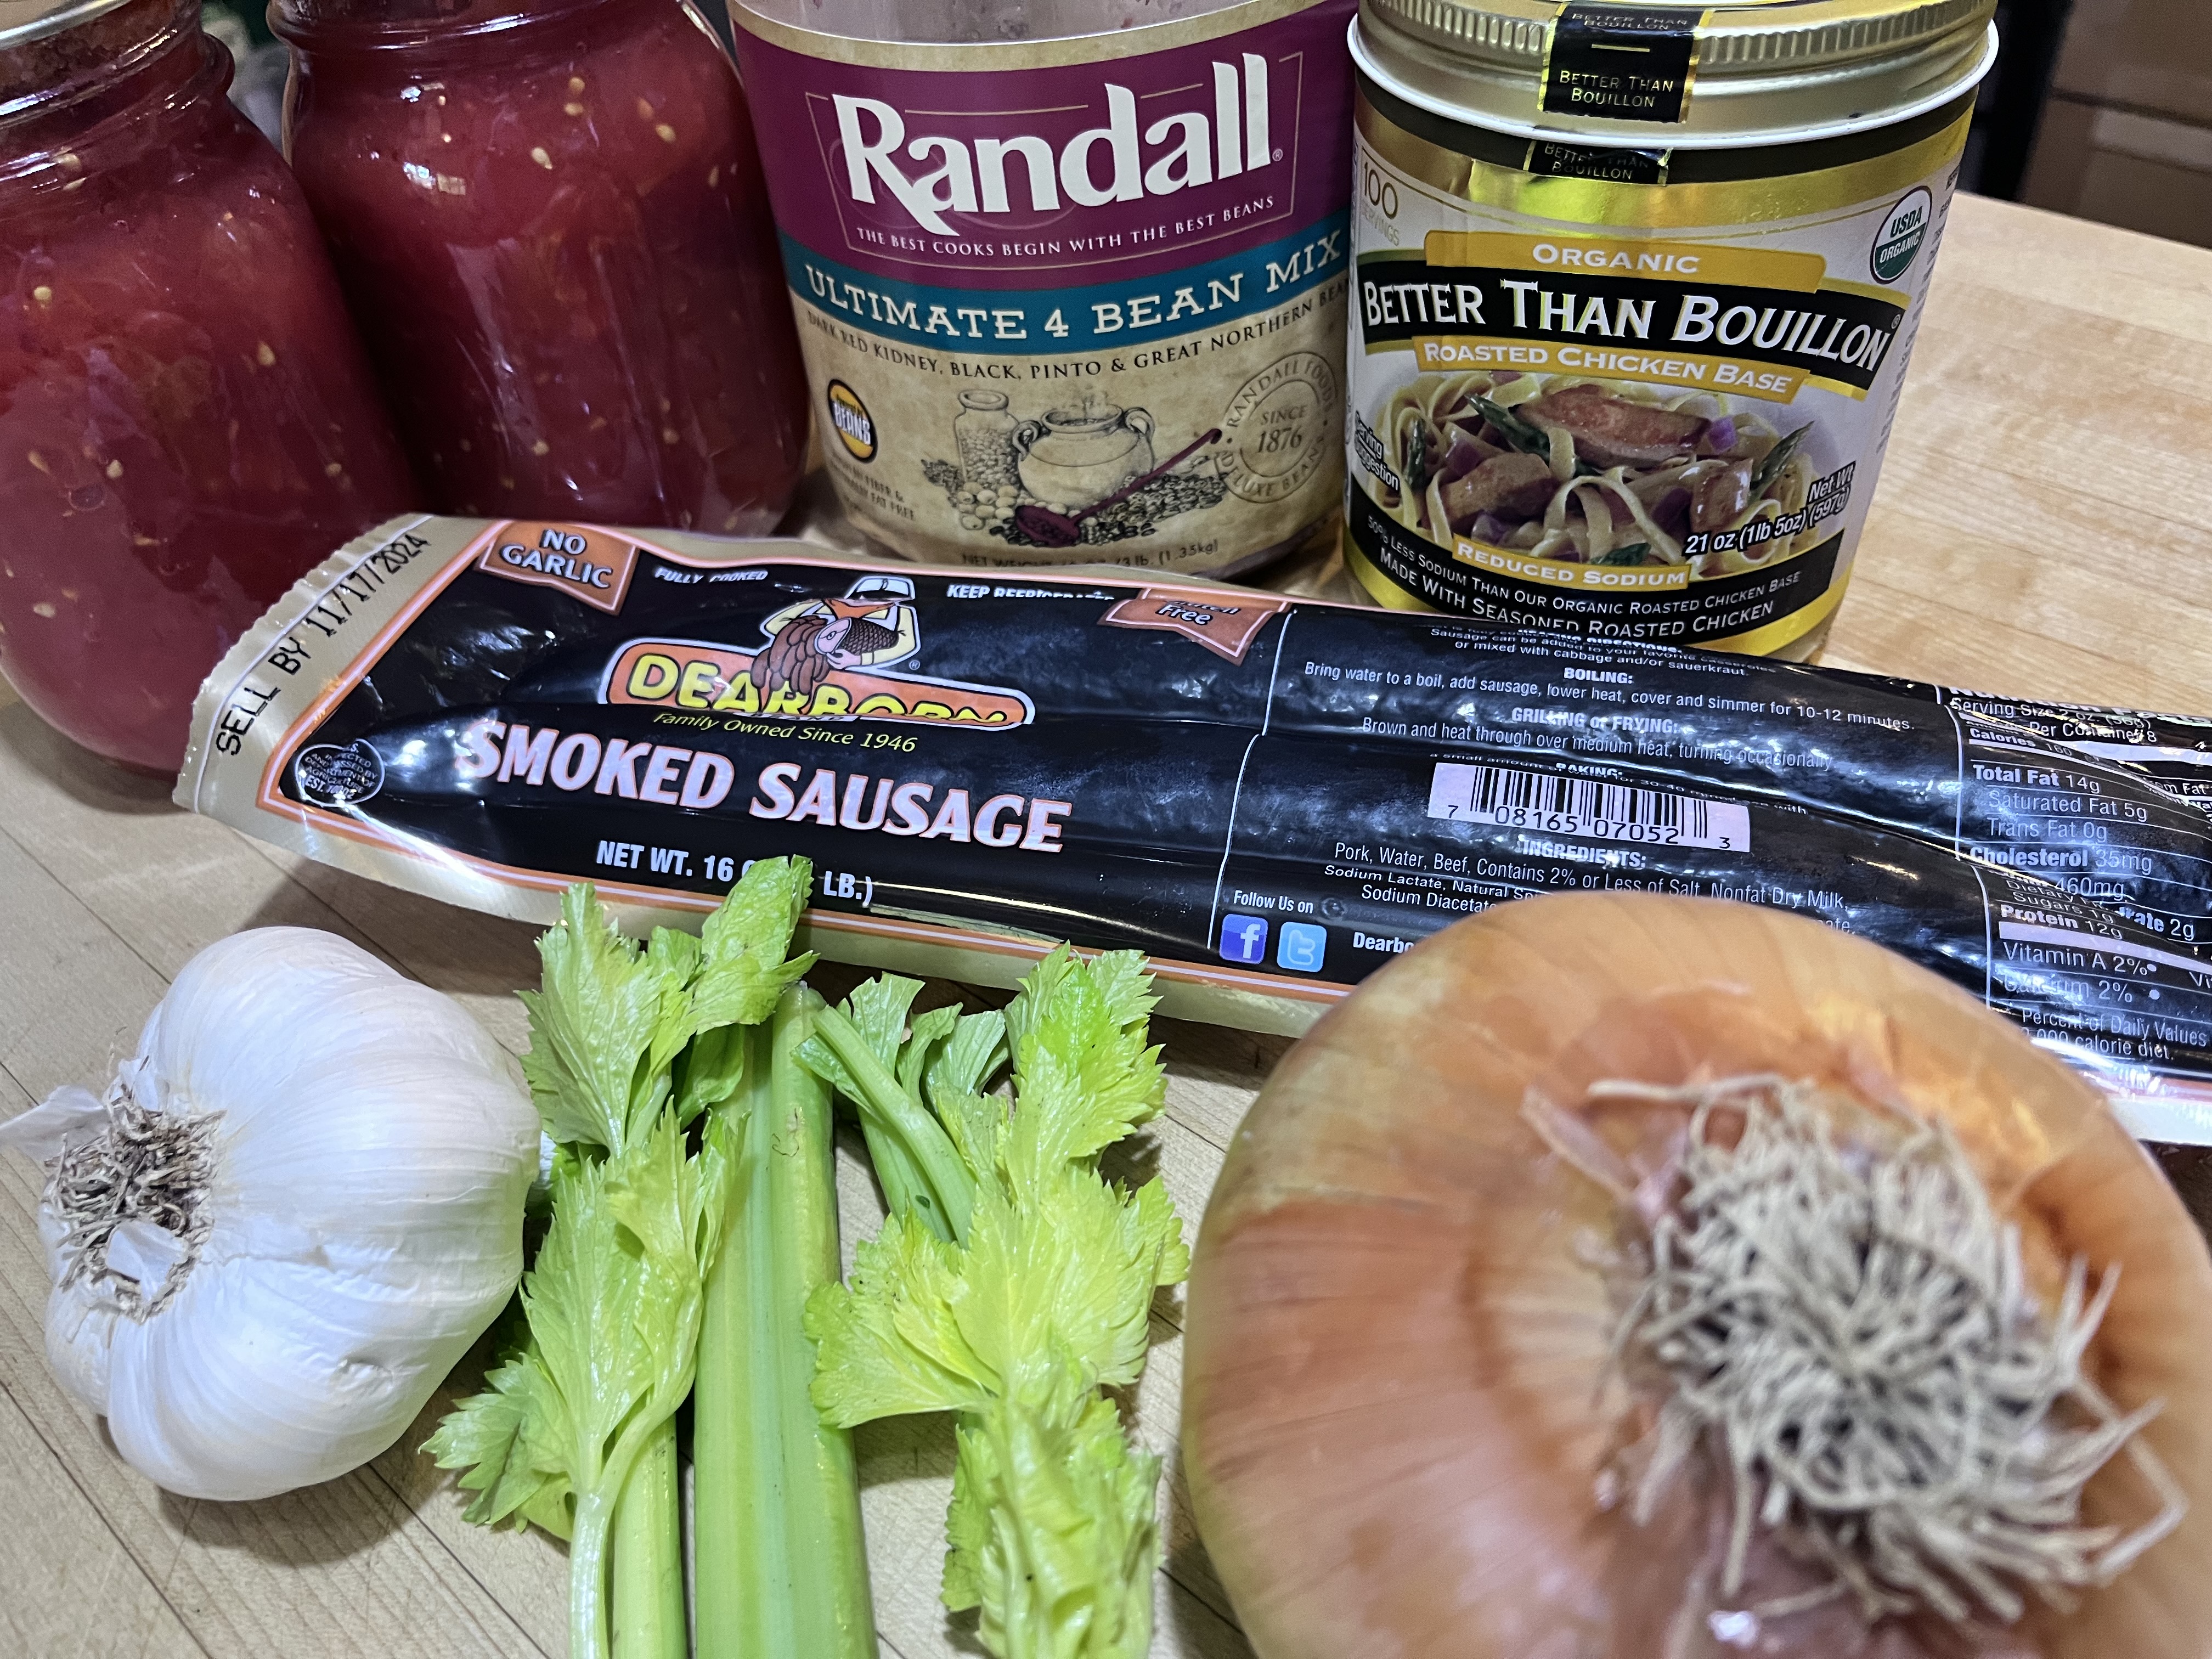
Another “it’s soup weather” recipe, and I do love soup weather. I’ve been making this soup for years, and I’m pretty sure it was a recipe I found on a jar of Randall’s beans. I must tell you, a jar of Randall’s beans is a great grocery find. They are perfect for soup, refried beans, and baked beans. Randalls do the soaking and cooking for us…so easy to use and delicious to eat. Beans are a great source of plant protein, fiber, vitamins, and minerals and they’re low in fat. As an added benefit, beans are great colon cleansers. 🙂 All beans are considered legumes, but not all legumes are considered beans. For instance peanuts are not really nuts, they are actually legumes…edible seeds that grow in pods. Personally, beans and nuts are more appetizing words than legumes, so bean soup it is.

Ingredients:

1/2 pound smoked sausage of your choice

6 cups of chicken broth

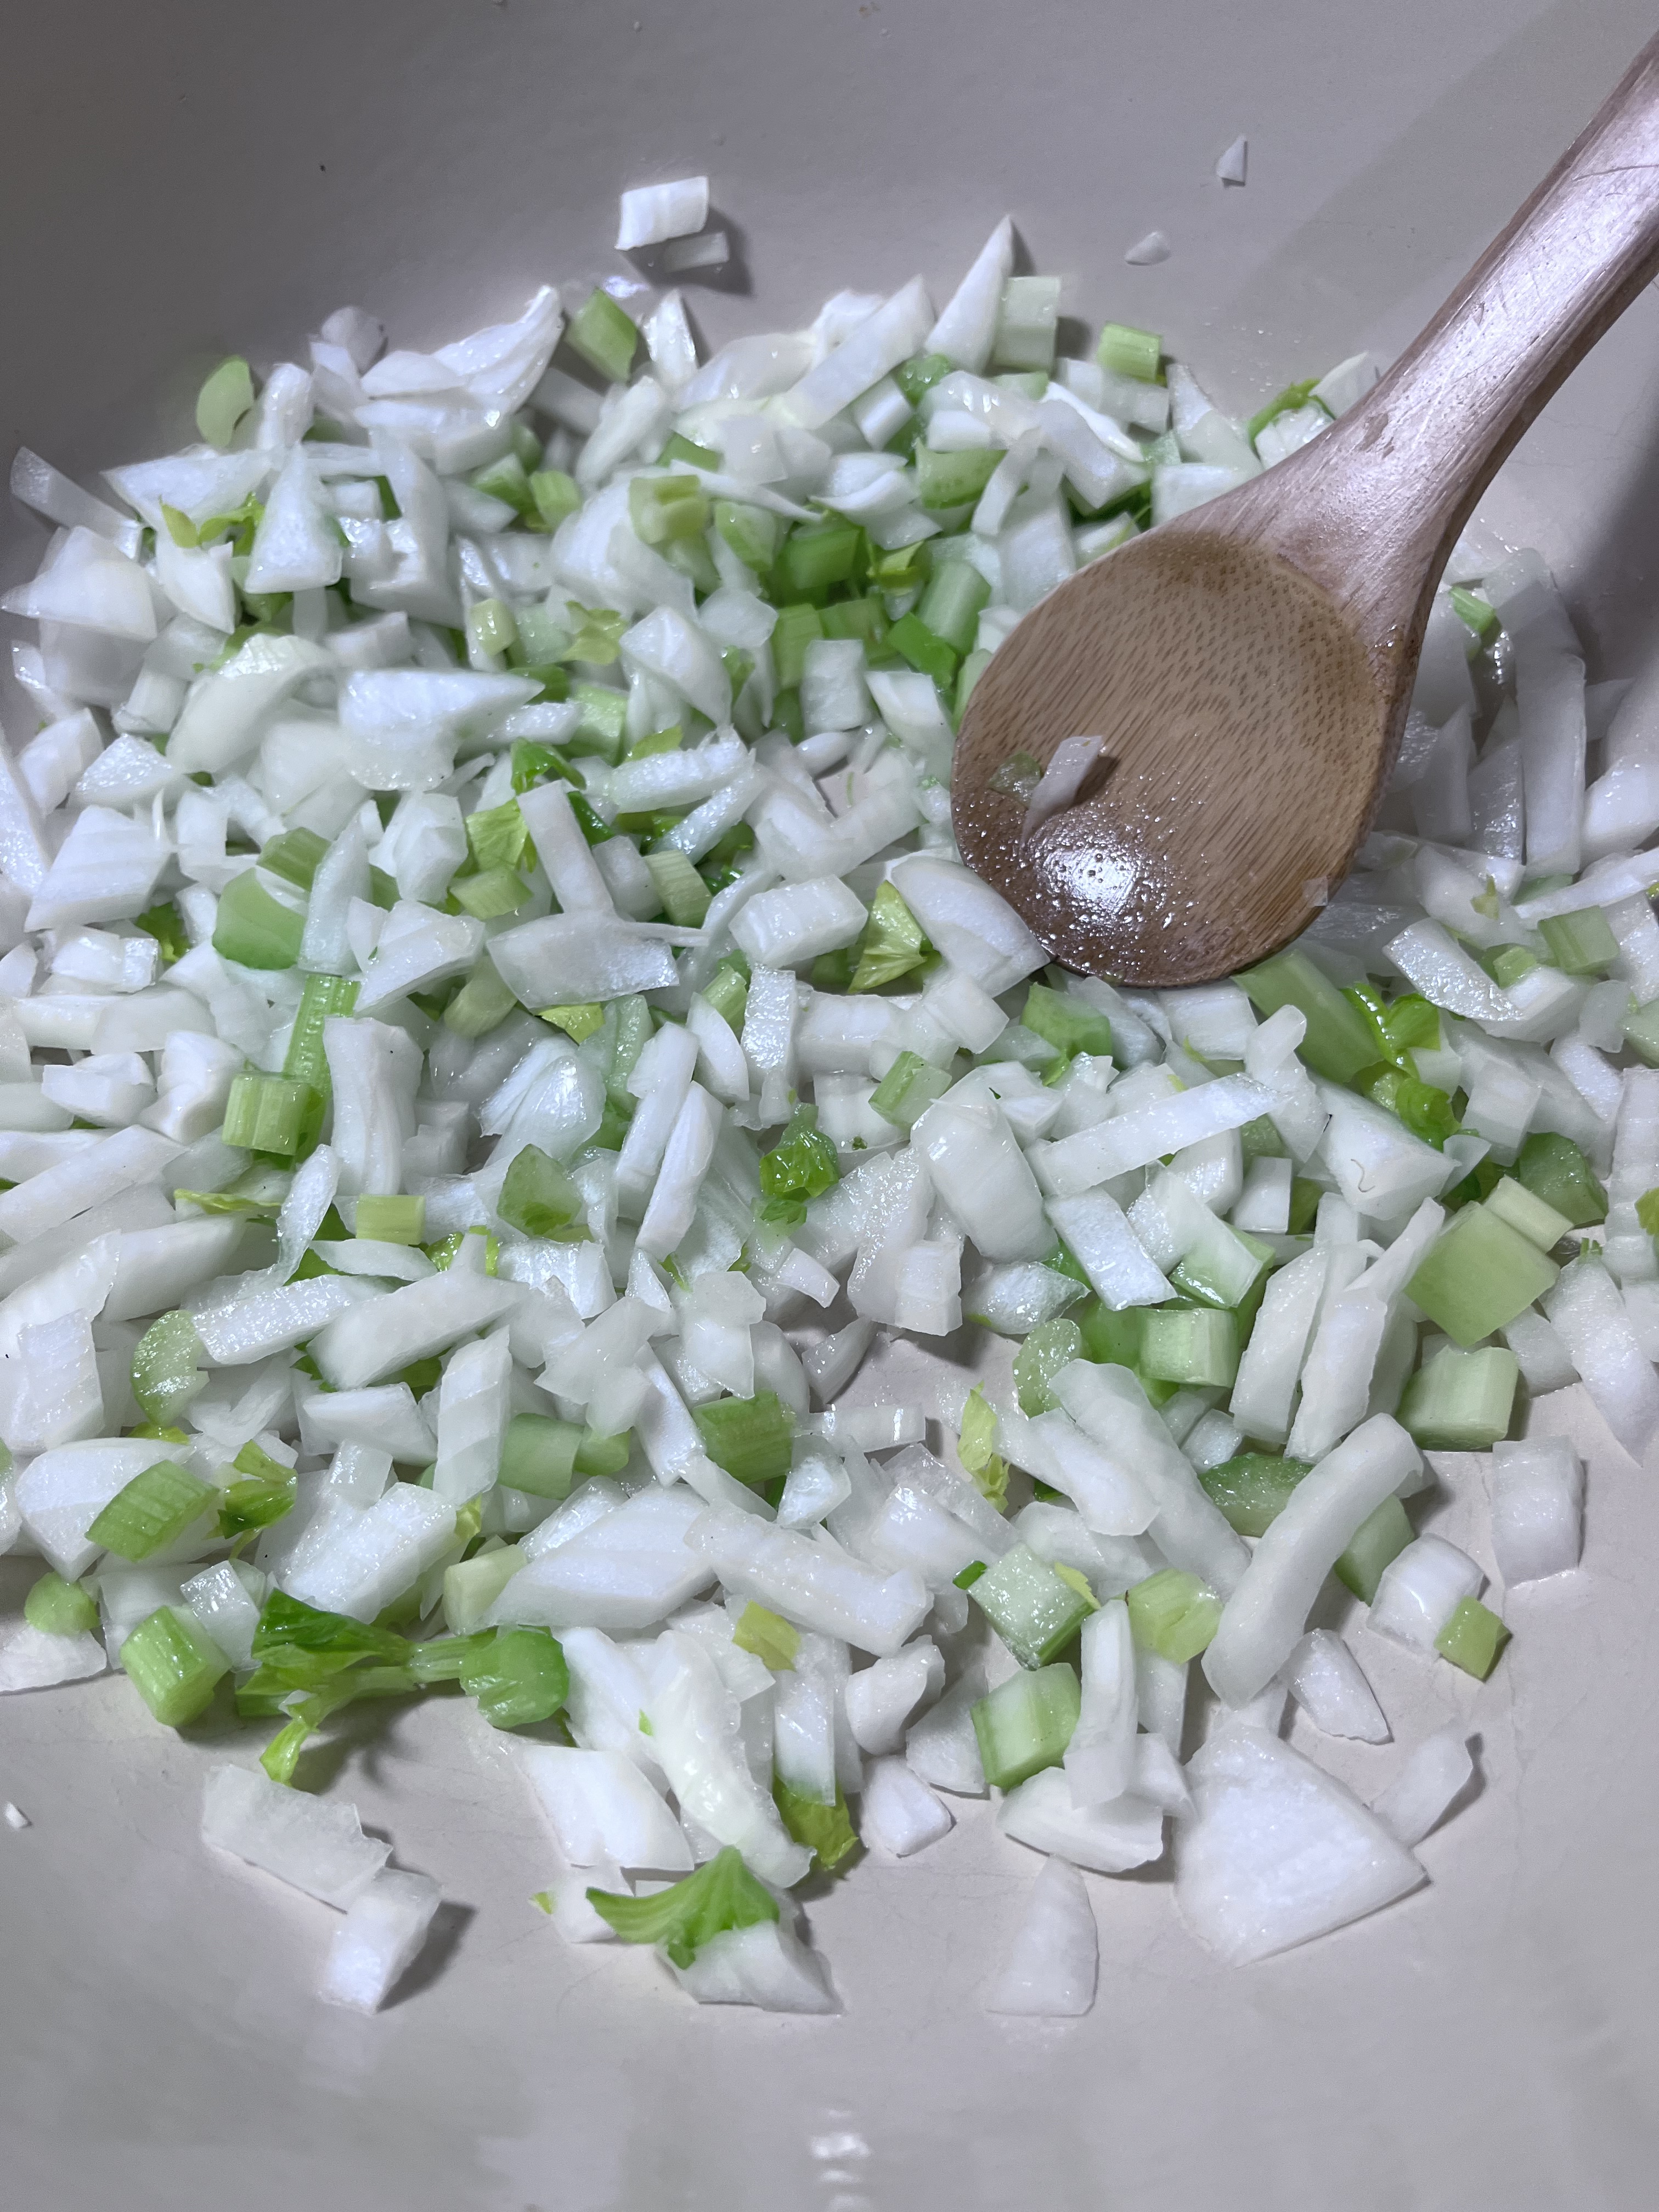
1 cup of diced onion

1 cup of diced celery

2-3 cloves of garlic minced

1 tsp thyme

salt and pepper to taste

28 oz of diced tomatoes

48 oz jar Randall’s mixed beans

kale or spinach (optional)

Prep all of the veggies and cut the sausage into half moons.

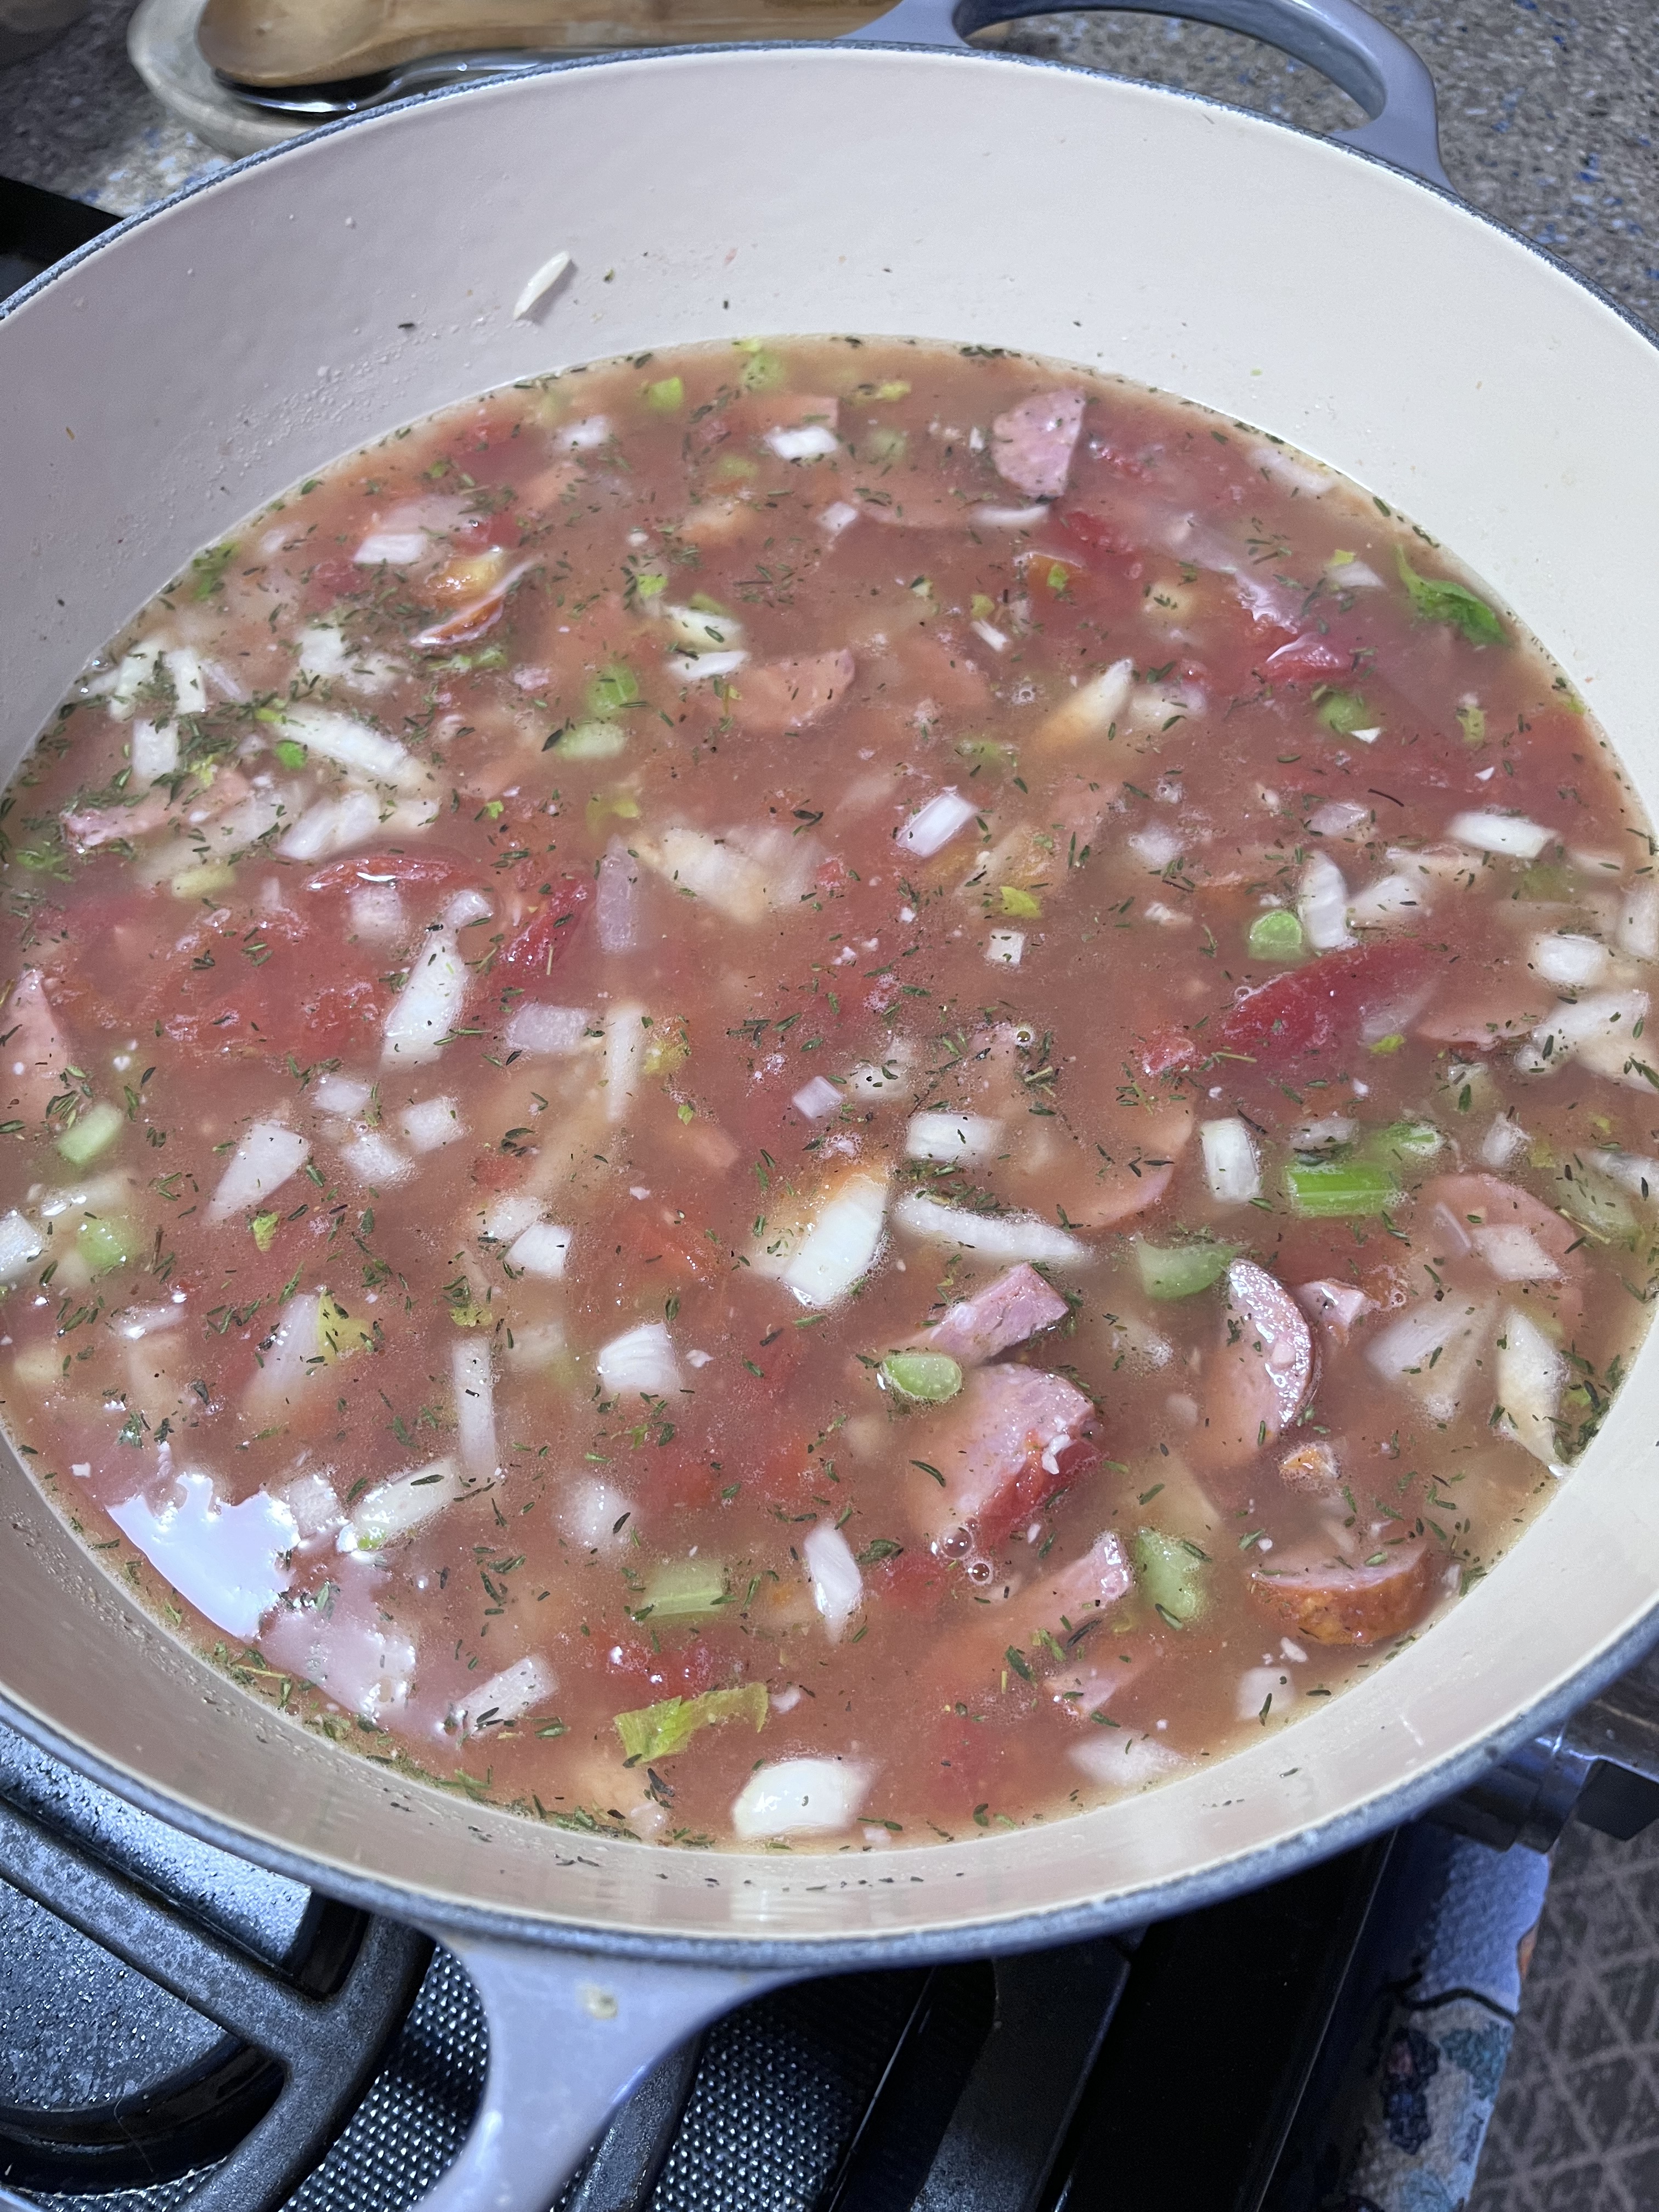
Add a tablespoon of vegetable oil to a large Dutch oven and sweat the veggies for a couple minutes. Season with salt and pepper and add the thyme.

Add the sausage, the tomatoes, and the broth. Bring to a boil. Reduce the heat and simmer, partially covered, for 30-45 minutes. Drain the jar of beans and add them to the soup pot.

If desired, add a few handfuls of chopped kale or spinach.

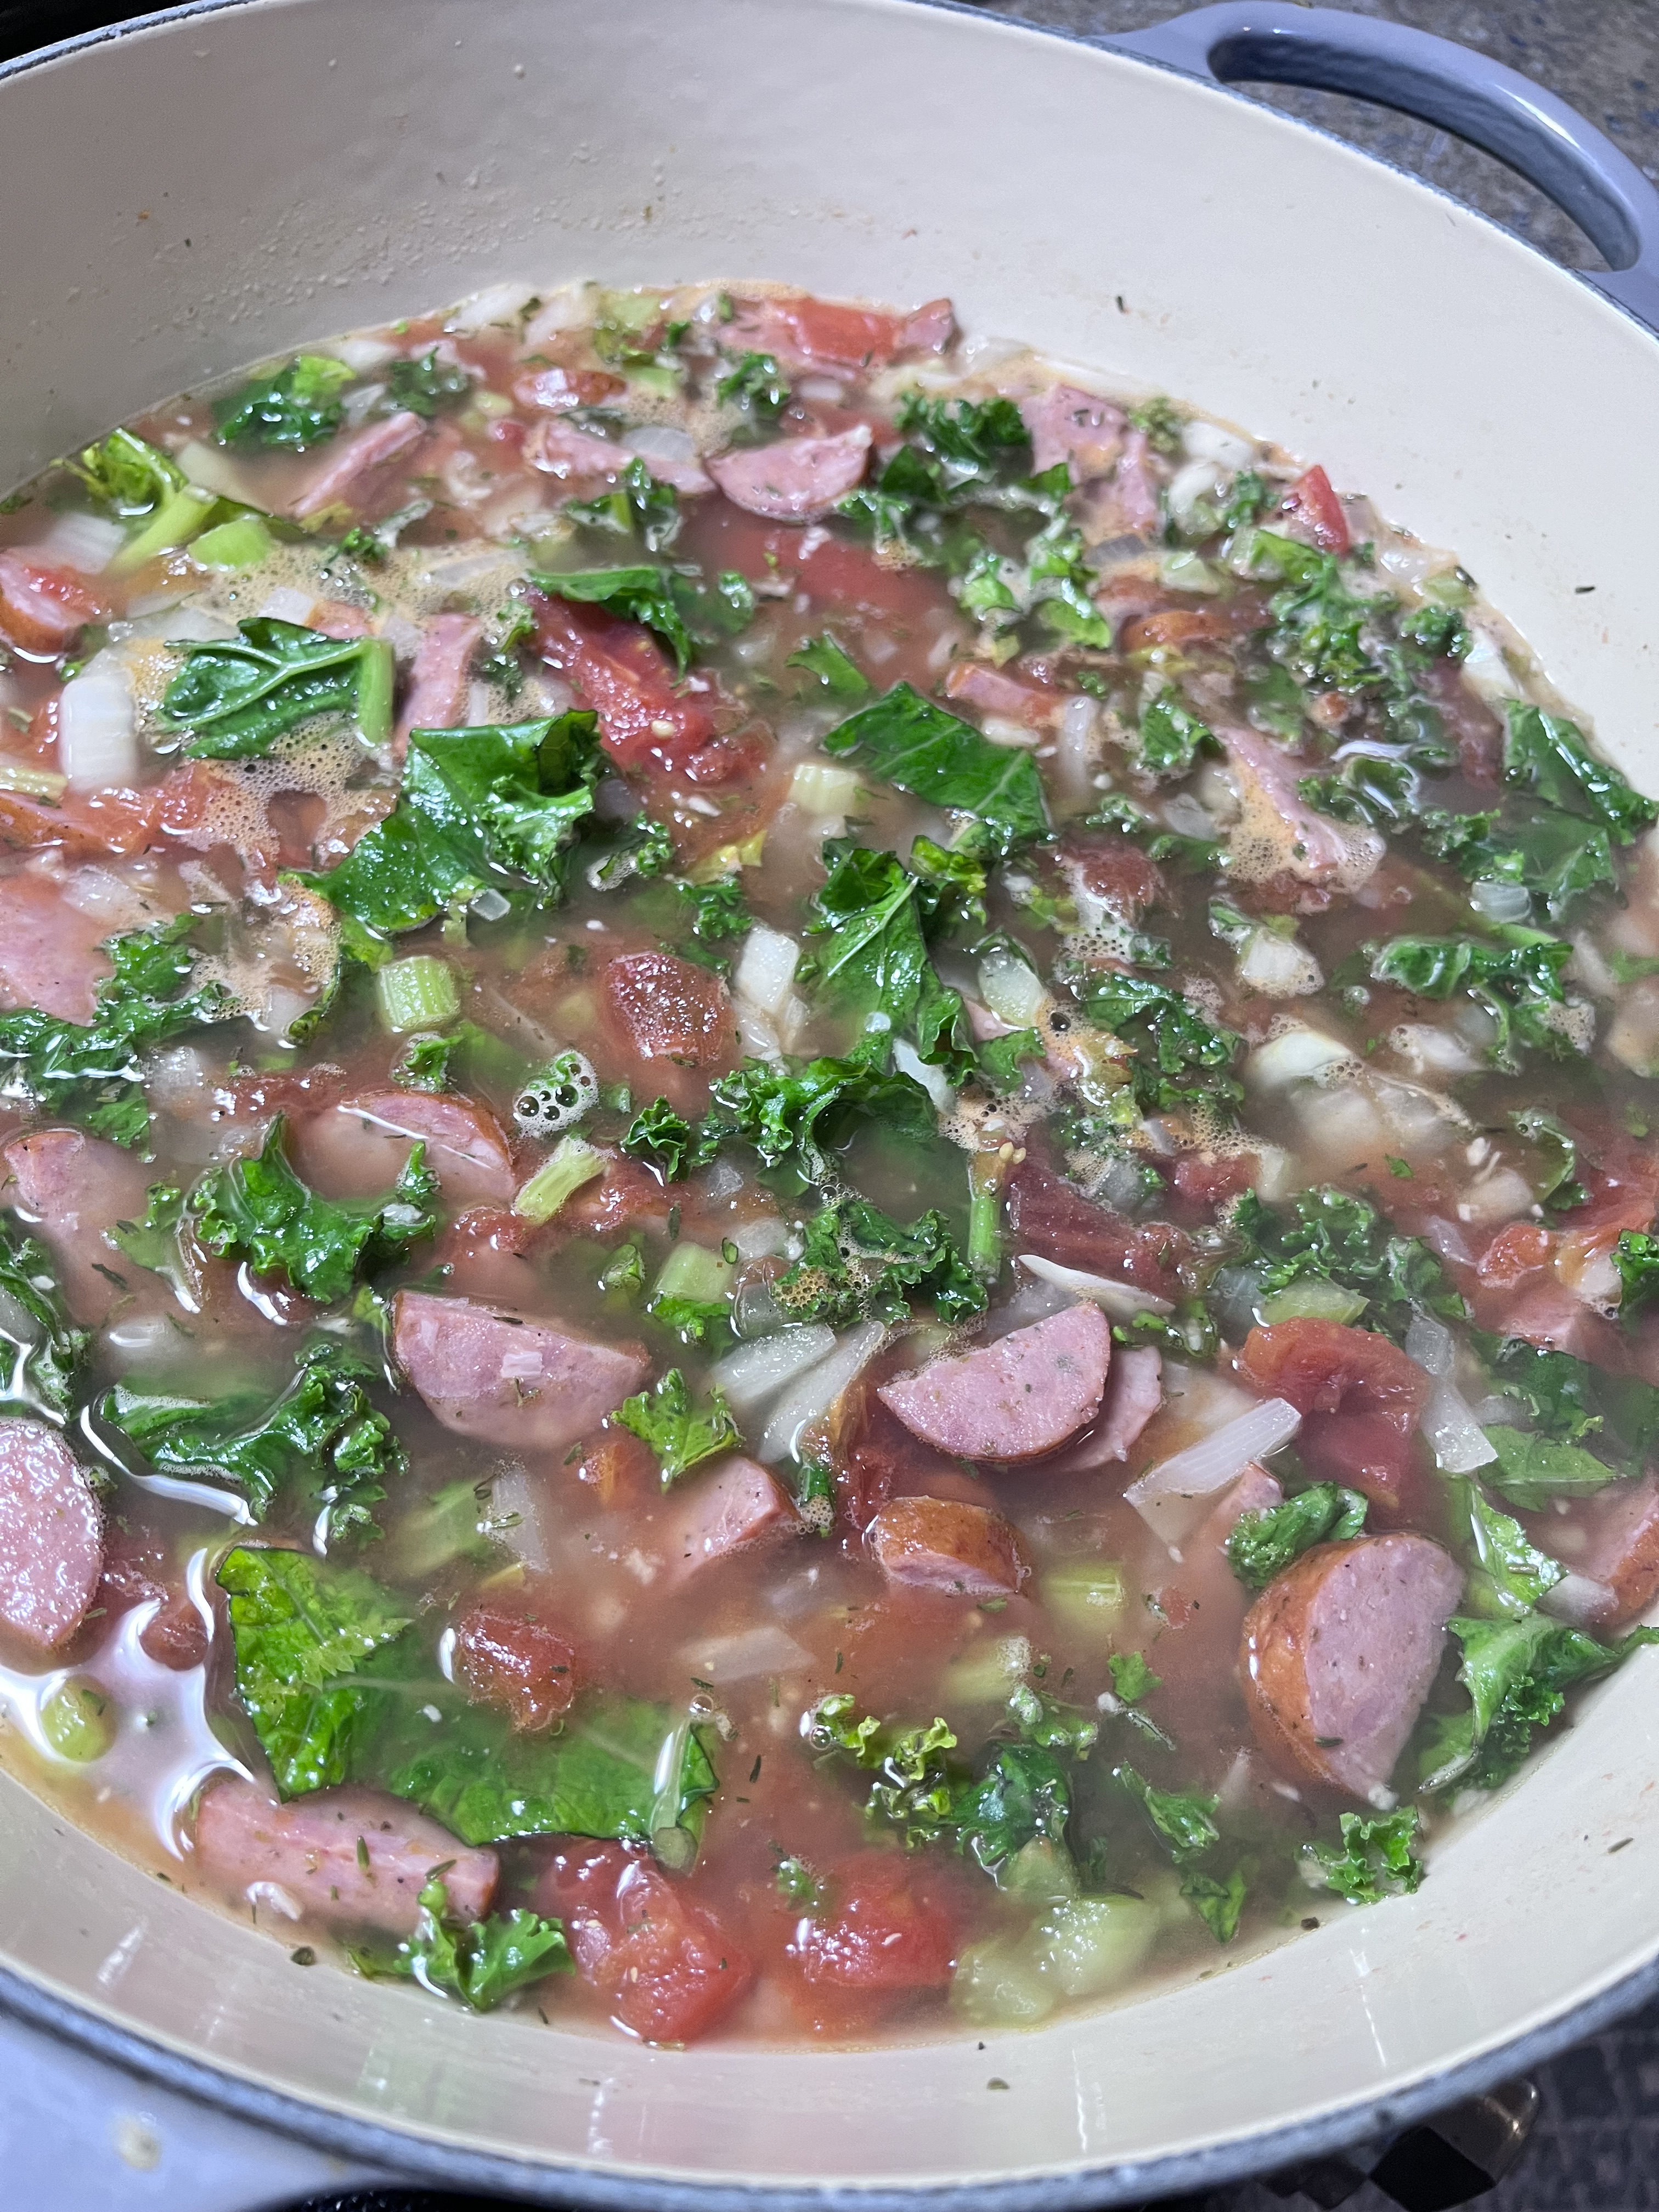
Continue to simmer for 10 minutes or so until the greens are wilted, and the beans are heated.

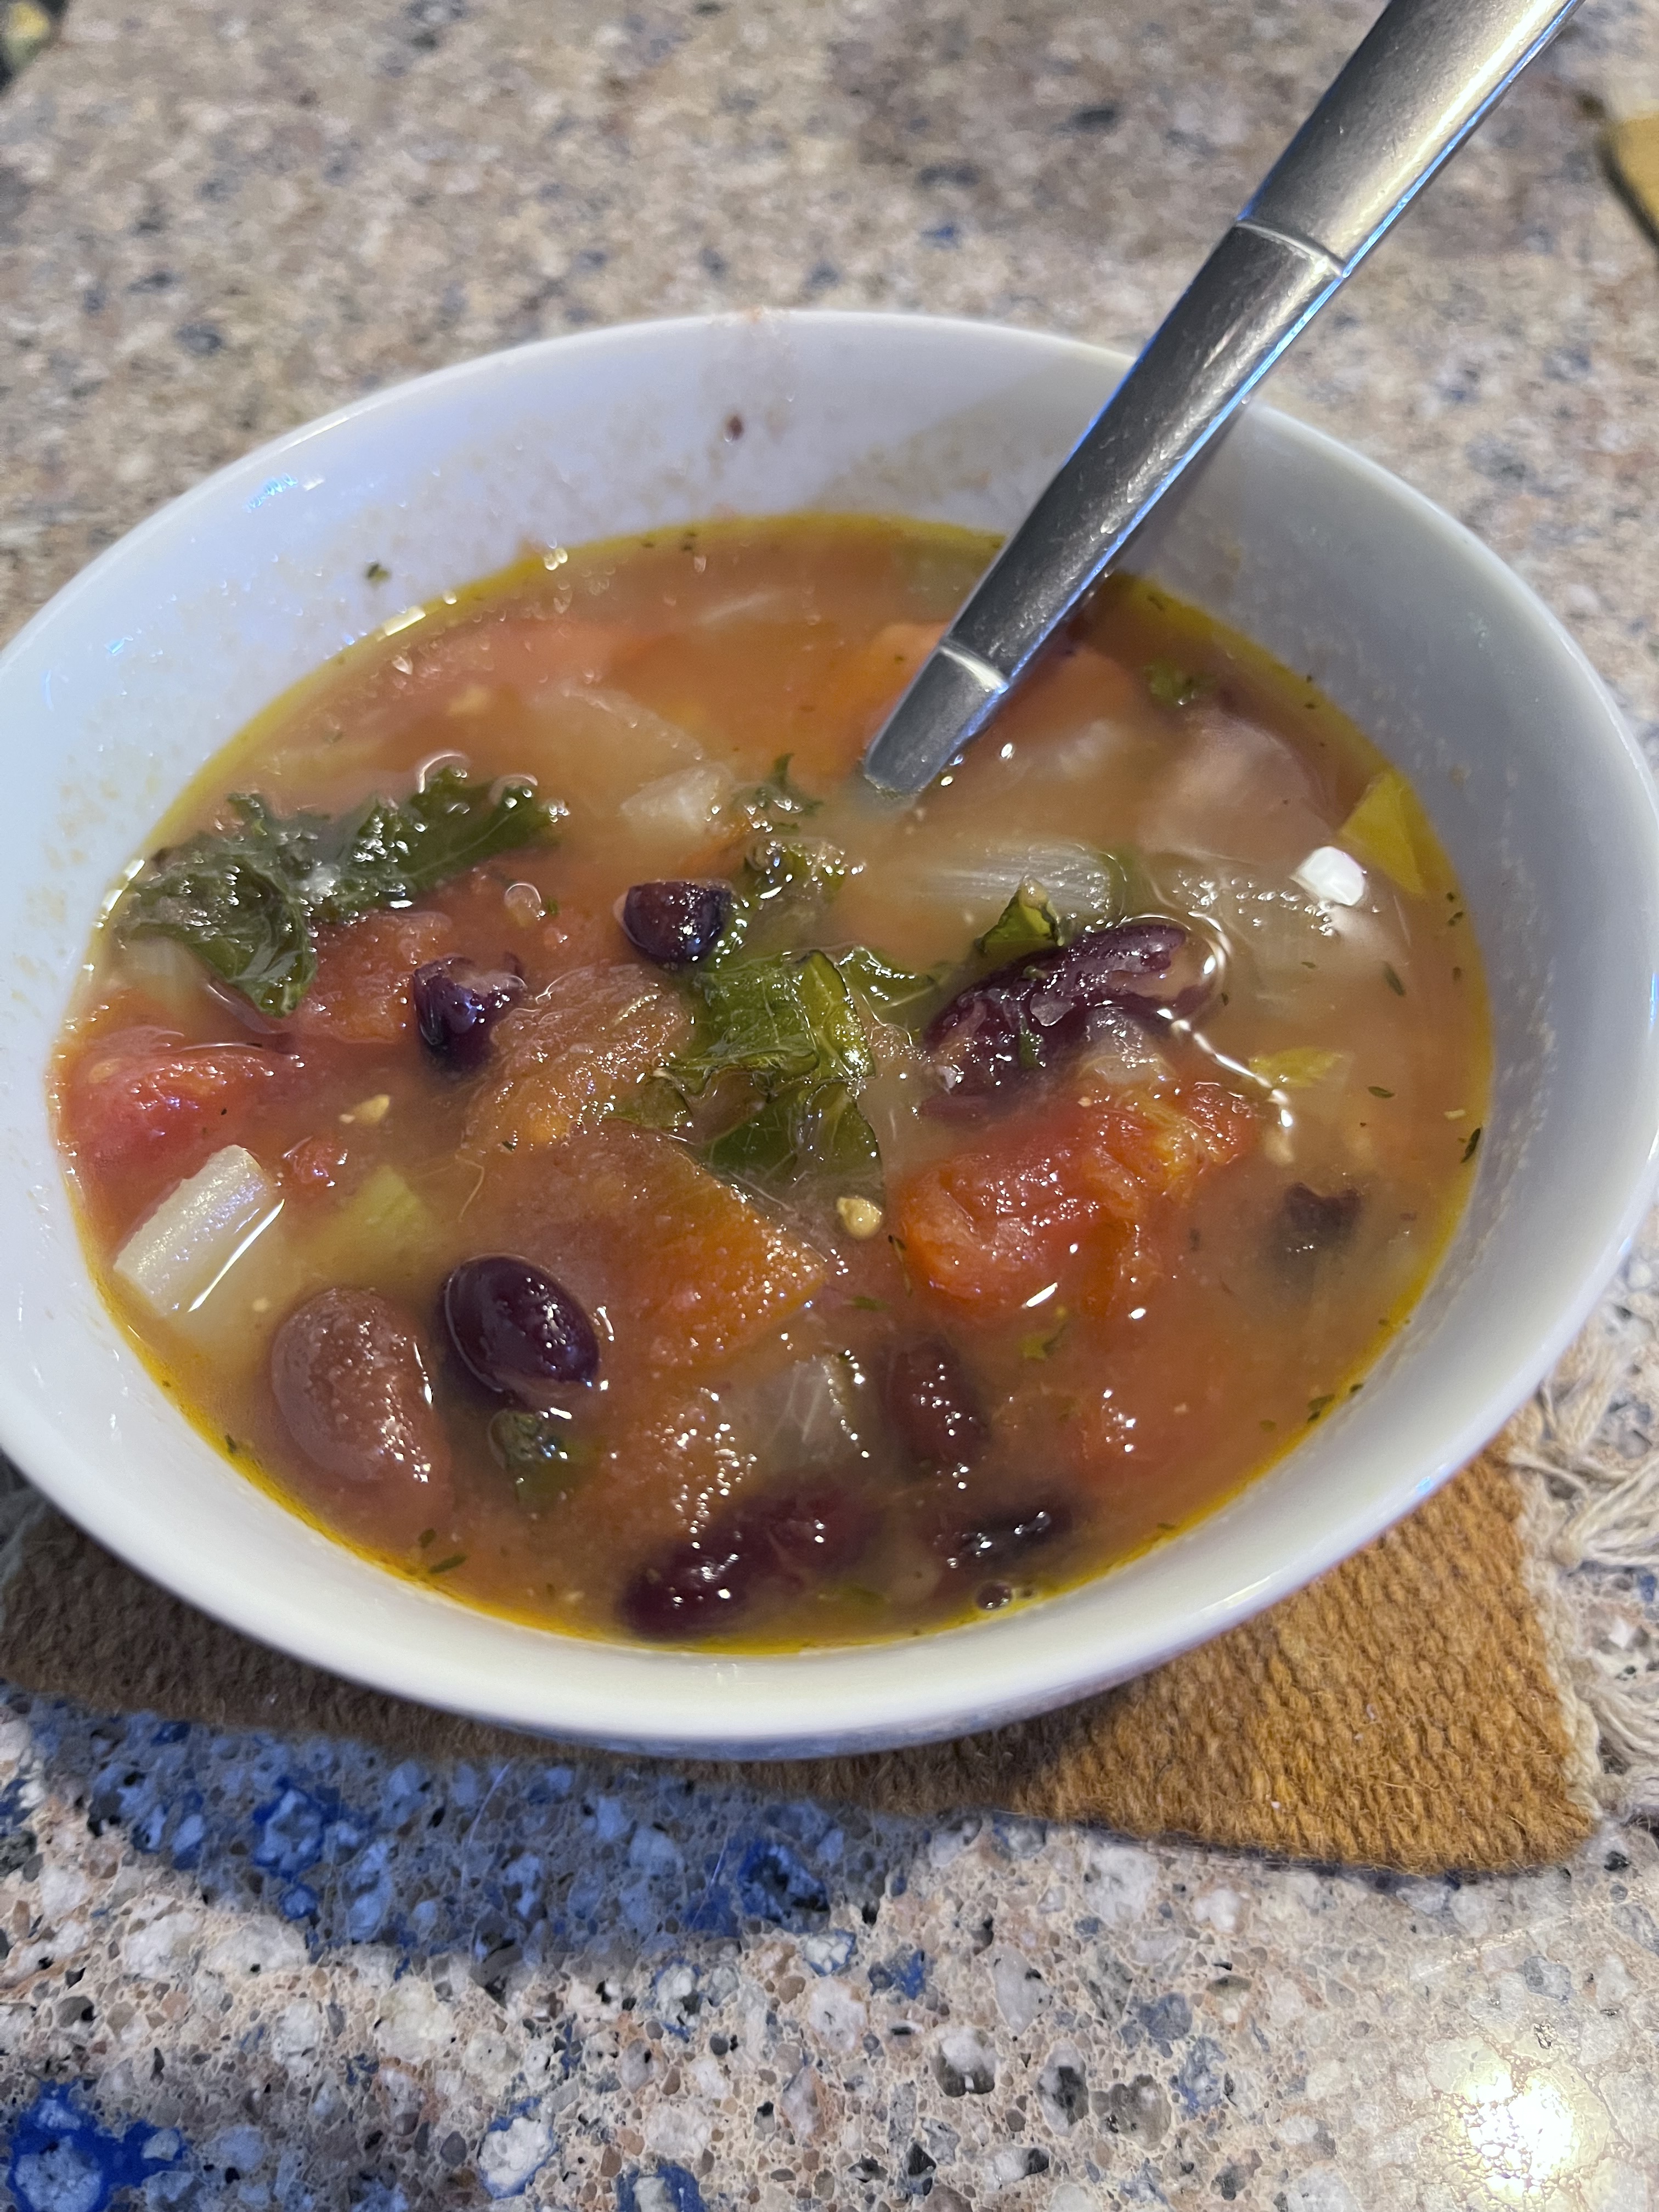
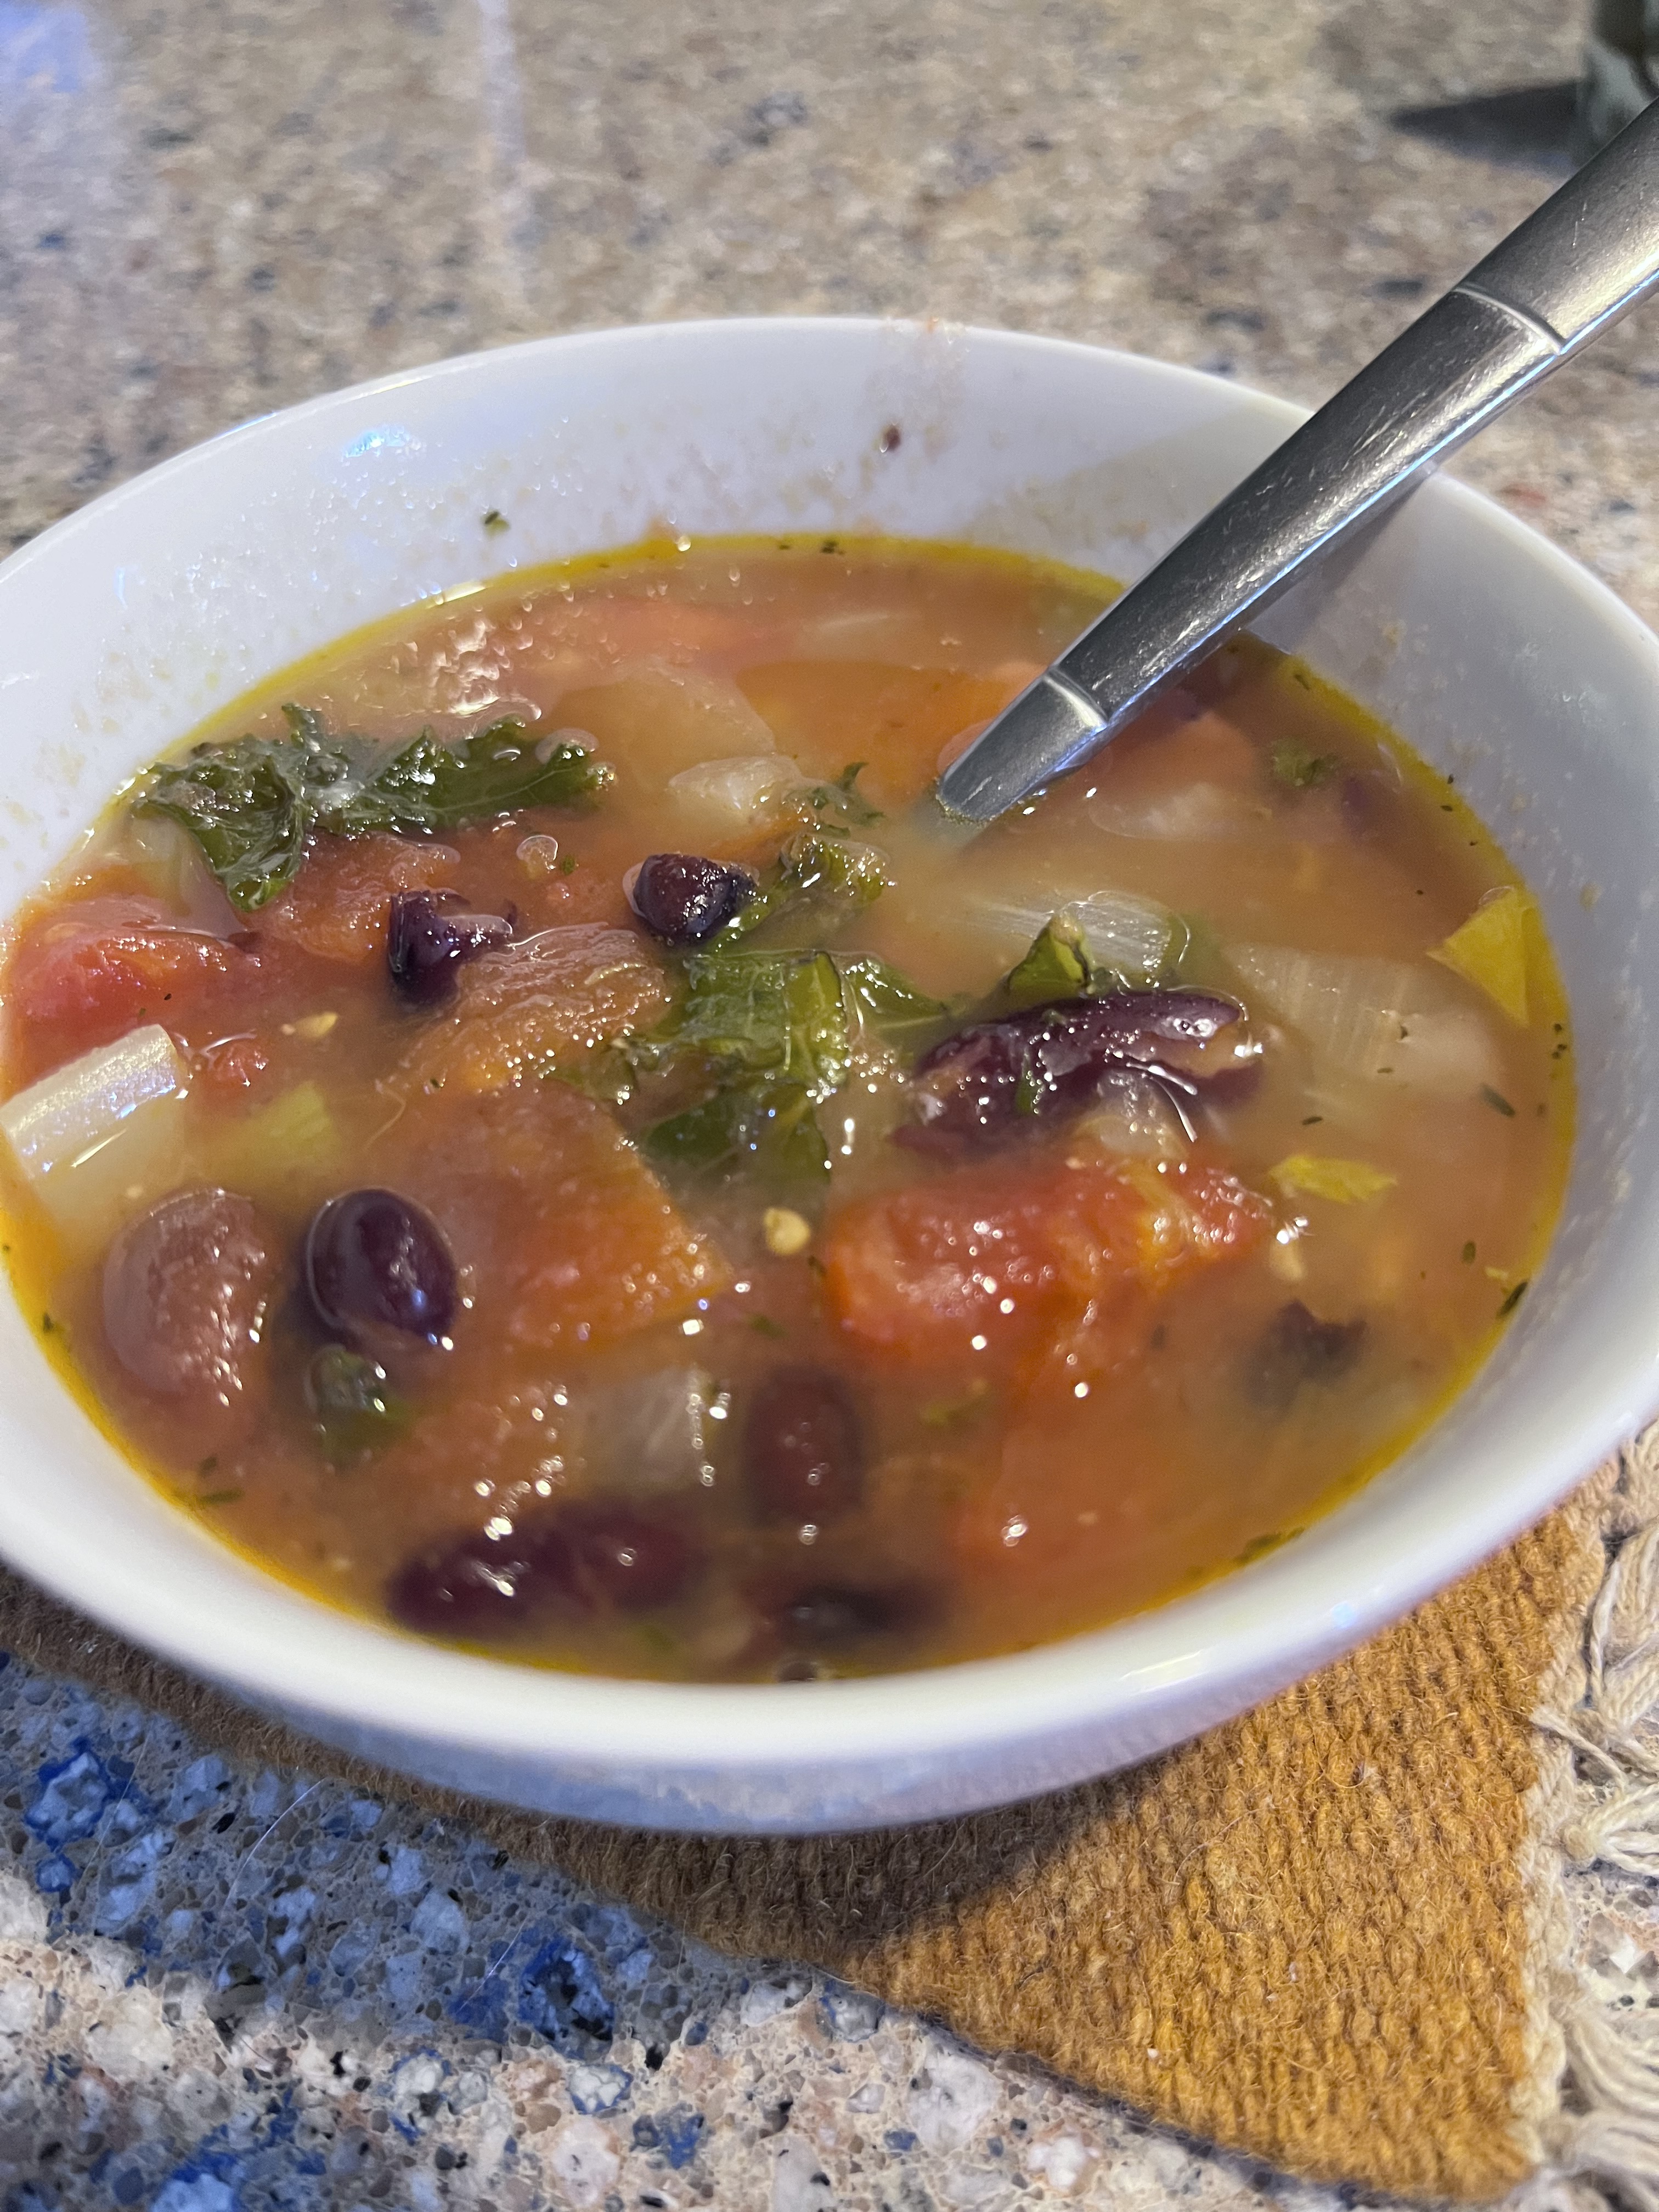
Ladle into bowls and enjoy. Delicious!

NOTE: Great served with some crusty bread and a bit of fresh grated parmigiana. I used Michigan smoked sausage from Dearborn, but feel free to use your favorite. You can also add additional vegetables like diced carrots or potatoes.

If you want to kick up the flavor a bit, add some red pepper flakes.

Caramel and Heath Bars

My husband loves sweets, and Heath Bars are one of his favorite candy bars. So I modified a bar cookie recipe to incorporate toffee pieces with caramel, and they were a big hit. Here’s a bit of Heath trivia for you. Heath Bars were born in the USA. They were first manufactured in 1928 in Robinson, Illinois by two brothers, Bayard and Everett Heath. Their confectionery business was called Heath & Sons Inc., and the chocolate bars were marketed as “America’s Finest” with people traveling from afar to get some. When the Heath family sold the confectionary business and started a dairy farm, the brothers brought their candy making equipment with them. The dairymen delivering milk and cheese added Heath Toffee to the list of items customers could order. The Heath Bar also made an appearance in the supplies of fighters during World War II. Hershey began manufacturing Heath Bars in 1996.

Ingredients

12 T butter, melted

1 cup AP flour

1 cup long cooking oats

3/4 cup brown sugar

1 tsp baking soda

1/2 tsp salt

11 oz bag baking caramels

1/4 cup heavy cream

8 oz bag of heath bar pieces

Preheat your oven to 350 and line an 8×8 pan with parchment paper sprayed with Pam. Pour the baking caramels into a microwave safe bowl along with the heavy cream, and microwave on high for 2 minutes, stirring every 30 seconds. Once the caramel is melted set it aside. You can also melt your caramel stovetop in a small saucepan over low heat, stirring occasionally, until all of the caramel pieces are melted and mixture is smooth.

In a medium size bowl combine melted butter with the flour, oats, brown sugar, soda, and salt.

Stir well to combine. Press half of the mixture into the bottom of a 8×8 pan using a spatula to even it out. Set the remaining mixture aside. Bake for 10 minutes. Remove from the oven.

Sprinkle the Heath Bar pieces over the base.

Pour the melted caramel on top of the Heath Bar pieces. Scatter the remaining oat mixture as evenly as possible over the top.

Bake for 18-20 minutes until golden brown. Remove to a cooling rack. Allow the bars to cool completely before slicing.

Cut into bars and enjoy.

NOTE: You can substitute chocolate chips or chocolate candy pieces like KitKats, Snickers, or Reese Peanut Butter Cups to equal 1 cup. You can see in the picture that I tossed in a few random pieces of KitKats. If your kiddos get too much chocolate this Halloween you know what to do…chop it up and make a pan of bars!

One of the tricks I’ve learned after years of making bar cookies is to always line my pan with parchment paper with an overhang. This makes lifting the bars out of the pan, cutting them, and cleaning the pan, SO MUCH easier.

Chocolate Chip Cookie Bars

A few weeks ago on a Friday evening I decided to make a treat to send with my husband to a meeting he was attending the next day. Because it was late-ish I decided bars would be less time consuming than cookies. I looked through several recipes and modified a chocolate chip cookie recipe that I thought would work in a 9×13 pan. Initially I thought it might be a fail because as the bars cooled the center sank a bit and the sides seemed extra tall. But everyone loved them and they were gobbled up in no time. The side pieces are perfect for the people that love the crispy edge pieces, and the center is still soft and chewy for the people who, like my daughter, prefer center bites…like the cinnamon roll in the middle of the pan. Today I made another pan of these cookie bars to share with friends. Still less time consuming than individual cookies. Still have sides that are taller and crispier than the center. Still just as delicious.

Ingredients:

3 1/4 cups (405 g) all purpose flour

1 1/2 tsp baking soda

1 1/2 tsp salt

1 1/2 T cornstarch

18 T of butter melted

1 1/2 cups brown sugar packed

3 eggs

1 T vanilla

3 cups of chocolate chips (I use Ghirardelli and combine milk and dark chocolate)

Preheat your oven to 350 and line a 9×13 pan with parchment paper allowing for overhang. The parchment paper makes for easy clean up, no sticking, and the bars lift out easily for cutting.

Combine all of the dry ingredients and whisk to combine. Set aside. Whisk the brown sugar and granulated sugar together with the melted butter.

Whisk in the eggs, one at a time. Whisk in the vanilla.

Dump the dry ingredients into the butter and egg mixture. Stir until combined. Set aside 1/2 cup of chips and stir the remaining 2 1/2 cups into the batter.

Evenly distribute the batter into your prepared pan. Use a spatula to even out the batter. Sprinkle the chips you set aside over the top.

If you’re into sweet and salty sprinkle some salt flakes on top of the batter. Bake for approximately 35 minutes. The top should be a nice golden brown.

Allow them to cool completely before cutting. Enjoy!

NOTE: You can change up the chips based on personal preference…butterscotch, peanut butter, white chocolate, or any combination. This recipe would also be good with some chopped walnuts. I always freeze some individual bars and other desserts in case someone is looking for a midnight snack. These freeze nicely.

Zucchini Ravioli

I know I’ve mentioned this before, but I am hooked on Instagram reels, particularly food reels. I was intrigued by these little ravioli pockets made with zucchini, and since I had a plan to can tomato sauce yesterday, I decided it was a perfect day to try my hand at these “healthier” ravioli. And to test my sauce. This is the time of year that zucchini is very plentiful, but you don’t want to use the giant ones. Save those for making breads and cakes and savory dishes like ratatouille. The pockets were fun and easy to make. I must admit that ravioli made with homemade pasta trumps zucchini ravioli by a smidge, but I thought these were delicious. And if you’re counting calories, all the better! Love experimenting with new things…and even happier when they are a success.

Filling Ingredients:

15 oz of ricotta

1 egg

1 1/2 cups of mozzarella

3/4 cup fresh grated parmigiana

1 1/2 cups of chopped spinach (fresh or frozen)

2 tsp Italian seasoning

salt and pepper to taste

tomato sauce of your choosing

And 3 medium size zucchini

Add all of the filling ingredients to a mixing bowl and stir well to combine.

I used a mandolin to slice my zucchini but you could also use a peeler. You want the slices to be nice and thin to get a good fold.

Preheat your oven to 375. Start forming your ravioli. Take two zucchini ribbons and crisscross them. Put a generous tablespoon of filling in the center and fold the ends over to form a pocket.

The filling and zucchini made approximately 2 dozen ravioli.

I lined a jelly roll pan with heavy foil (for easy clean-up) and spread about a cup of sauce in the pan. Arrange the ravioli on top of the sauce.

Add a dollop of sauce on top of each pocket.

Sprinkle with 1/2 cup mozzarella cheese and 1/2 cup freshly grated parmigiana cheese.

Bake for 25-30 minutes until the cheese is melted and golden.

Serve with a nice salad and some garlic bread, and enjoy a delicious, healthy, almost diet worthy dinner!

NOTE: You can modify the filling based on personal preference. My filling recipe is basically the filling I use for stuffed shells and lasagna. Fresh parsley or basil could be substituted for the spinach.

Prefer an Alfredo over a red sauce…that would be delicious as well.

Beef Barley Soup

Fall is here and that means it’s soup weather in Michigan and, I’m sure, all over the Midwest. Last week I made beef barley, one of my husband’s favorites. I used my pressure cooker because I think the cooking process intensifies the flavors and definitely makes the meat melt in your mouth tender. An insta-pot also functions as a pressure cooker and a Dutch oven on top of the stove would work also. This is the kind of soup that most of us have all the ingredients for in our kitchens. I used a package of cubed chuck and, after searing, I cut it into even smaller pieces. The thing about soup is there are guidelines but no hard and fast rules. Make it your own. Don’t like some of the veggies, substitute. We have a good friend who won’t eat anything with bay leaves, so leave the bay leaves out. Whatever adjustments you make, when it’s done you’ll be enjoying a nice, hot bowl of soup with a hunk of crusty bread or some croutons, and you’ll be happy you made it!

Ingredients:

2 pounds (give or take) of cubed beef

olive oil for searing

1 large onion diced

1 or 2 russet potatoes peeled and diced

3 medium carrots diced

1 cup of diced baby portabellos

3 ribs of celery diced

6 garlic cloves minced

2 bay leaves

Bundle of fresh thyme

2 T tomato paste

2 pints of diced tomatoes

4 cups of beef or mushroom stock (or a combination of both)

1 T soy sauce

3/4 cup of barley

Wash and dice all of your vegetables.

Set your pressure cooker to browning. Season your beef with salt and pepper. Add some olive oil to the pan and sear the meat in batches. Once all of the meat has been seared cut it into smaller pieces and set aside along with all the meat juices.

Add all of the veggies to the pot and sauté for 4-5 minutes stirring occasionally.

Turn the pressure cooker off. Return the beef and the juices to the pan. Add the bay leaves, tomato paste, tomatoes, broth, and the soy sauce. Use kitchen twine to secure the thyme and add to the pot. Secure the cover and process on high pressure for 15 minutes. Allow the pot to naturally release for 15 minutes, and then carefully release the remainder of the steam.

Because I had quick barley I added it after releasing the pressure. Set the pot to simmer and simmer for 15-20 minutes until the barley is tender.

Ladle into bowls and enjoy.

The soup will taste even better on day two!

NOTES: Frequently recipes will call for 1 T of tomato paste and you’re left with the majority of a can. I put the remainder of the tomato paste in an ice tray and when it’s frozen I transfer the cubes to a freezer bag. Each cube is approximately 1 T of tomato paste. No waste and handy for your next recipe.